Nissan Versa (N17): Inside handle
INSIDE HANDLE : Removal and Installation
REMOVAL
1. Remove front door finisher. Refer to INT "Removal and Installation".
2. Remove upper side of sealing screen.
NOTE: Cut the butyl tape so that some parts of the butyl tape remain on the sealing screen, if the sealing screen is reused.
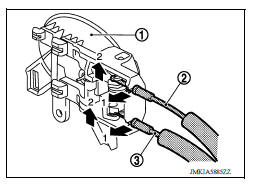
3. Disengage lock knob cable (2) and inside handle cable (3) from clip (1).

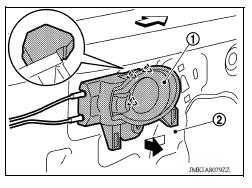
4. Remove inside handle bolt.
5. Disengage inside handle (1) from door panel (2) by sliding toward vehicle rear and separating.
 : Pawl
 : Front
6. Disengage inside handle cable (3) and lock knob cable (2), and remove inside handle (1).
INSTALLATION
Installation is in the reverse order of removal.
CAUTION: After installation, check door open/close, lock/unlock operation.
 Door lock
DOOR LOCK : Removal and Installation REMOVAL Remove inside handle. Refer to DLK "INSIDE HANDLE : Removal and Installation". Remove outside handle. Refer to DLK "OUTSIDE HANDLE ...
Outside handle
OUTSIDE HANDLE : Removal and Installation REMOVAL 1. Fully close the front door glass. 2. Remove front door finisher. Refer to INT "Removal and Installation". 3. Remove sealing screen. ...
Other materials:
A/T Shift lock system
A/T Shift lock system : component parts
location
1 Stop lamp switch. 2 Shift lock release lever. 3 Park position switch.
4 Shift lock solenoid.
A/T Shift lock system : component description
...
Side air bag module
Removal and Installation
REMOVAL
WARNING:
Do not leave any objects (screwdrivers, tools, etc.) on the seat during seatback
repair. It can lead to
personal injury if the side air bag should accidentally deploy.
CAUTION:
Before servicing, turn ignition switch OFF, disconnect both
battery ...
Categories
- Manuals Home
- Nissan Versa Owners Manual
- Nissan Versa Service Manual
- Video Guides
- Questions & Answers
- External Resources
- Latest Updates
- Most Popular
- Sitemap
- Search the site
- Privacy Policy
- Contact Us

0.005