Nissan Versa (N17): Radiator core support upper
RADIATOR CORE SUPPORT UPPER : Removal and Installation
RADIATOR CORE SUPPORT UPPER
Removal
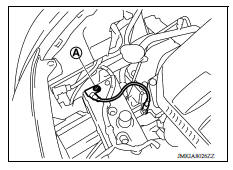
1. Remove ground harness bolt (A).
2. Remove horn. Refer to HRN "Removal and Installation".
3. Remove hood lock assembly and hood lock control cable assembly clip. Refer to DLK "HOOD LOCK : Removal and Installation".
4. Remove crash zone sensor. Refer to SR "Removal and Installation".
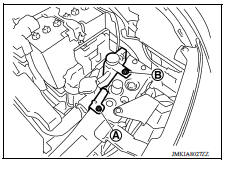
5. Remove radiator cap adapter bracket bolt (A) and radiator reservoir tank bolt (B).
6. Remove radiator upper seal clips.
7. Remove upper clips of radiator side seal (LH/RH).
8. Disconnect all harness clips.
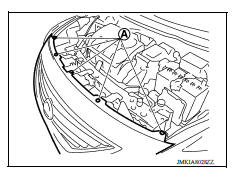
9. Remove front bumper fascia upper side clips (A).
10. Remove radiator core support upper bolts.
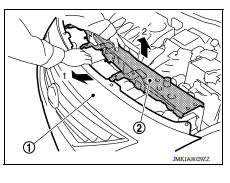
11. Pull back on upper part of front bumper fascia (1) and then remove radiator core support upper (2) by pulling upward.
Installation
Installation is in the reverse order of removal.
 Hood hinge
HOOD HINGE : Removal and Installation REMOVAL Remove hood assembly. Refer to DLK "HOOD ASSEMBLY : Removal and Installation". Remove hood support rod and grommet. Refer to DLK " ...
Radiator core support lower
RADIATOR CORE SUPPORT LOWER : Removal and Installation RADIATOR CORE SUPPORT LOWER Removal 1. Remove under cover. Refer to EXT "Removal and Installation". 2. Remove radiator upper sea ...
Other materials:
Oil filter
Removal and Installation
REMOVAL
Remove engine under cover.
Drain engine oil.
Remove oil filter using Tool (A).
: Front
Tool number : KV10115801 (J38956)
WARNING:
Be careful not to get burned; engine and engine oil may be
hot.
CAUTION:
When removing, prepare a shop cl ...
U0155 Lost communication (IPC)
DTC Logic
DTC DETECTION LOGIC
DTC
Trouble diagnosis name
DTC detection condition
Possible causes
U0155
Lost Communication With Instrument
Panel Cluster (IPC)
Control Module
When the ignition switch is ON,
TCM is unable to receive the
CAN communications ...
Categories
- Manuals Home
- Nissan Versa Owners Manual
- Nissan Versa Service Manual
- Video Guides
- Questions & Answers
- External Resources
- Latest Updates
- Most Popular
- Sitemap
- Search the site
- Privacy Policy
- Contact Us

0.0069