Nissan Versa (N17): Rear parcel shelf finisher
Exploded View
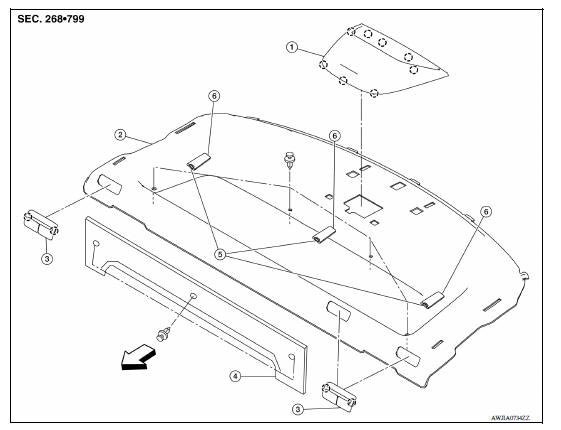
1. High-mounted stop lamp 2. Rear parcel shelf finisher 3. Seat belt finisher
4. Seatback latch cover 5. Top tether strap anchor 6. Top tether strap anchor
finisher
 Front
Front
 Pawl
Pawl
Removal and Installation
REMOVAL
- Remove high-mounted stop lamp. Refer to EXL "Removal and Installation".
- Remove rear pillar finisher. Refer to INT "REAR PILLAR FINISHER : Removal and Installation".
- Remove rear seat belt floor anchor bolts. Refer to SB "SEAT BELT RETRACTOR : Removal and Installation".
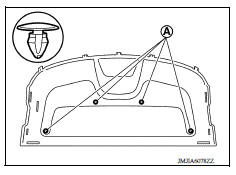
- Release seat belt finisher pawls using a suitable tool (A) and remove seat belt finisher.
 : Pawl

- Fold rear seatbacks down (60:40 split seatback) or remove fixed seatback. Refer to SE "Removal and Installation - Fixed Seatback".
- Remove seatback latch cover clips and seatback latch cover.
- Remove rear parcel shelf finisher clips (A).
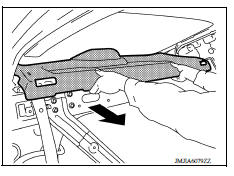
8. Pull rear parcel shelf finisher toward front and remove rear parcel shelf finisher.
 : Front
9. Release anchor finisher pawls and remove anchor finishers and anchors from rear parcel shelf finisher (if necessary).
INSTALLATION
Installation is in the reverse order of removal.
 Rear pillar finisher
REAR PILLAR FINISHER : Removal and Installation REMOVAL Partially remove rear body side welt. Refer to INT "BODY SIDE WELT : Removal and Installation". Remove rear seat cushion. Re ...
Floor trim
Exploded View 1. Harness clip A 2. Harness clip B 3. Floor carpet 4. Carpet hook 5. Front floor spacer (RH) 6. Front floor spacer (LH) 7. Rear floor spacer (LH) 8. Rear floor spacer (RH) Fro ...
Other materials:
Starting the engine (models without NISSAN Intelligent Key system)
1. Apply the parking brake.
2. Automatic Transmission / CVT models:
Move the shift lever to P (Park) or N (Neutral).
P (Park) is recommended.
The shift lever cannot be moved out of
P (Park) and into any of the other gear
positions if the ignition key is turned to
the OFF position or if ...
U0140 Lost communication (BCM)
Description
CAN (Controller Area Network) is a serial communication line for real-time
application. It is an on-vehicle multiplex
communication line with high data communication speed and excellent malfunction
detection ability.
Many electronic control units are equipped onto a vehicle, and ...
Categories
- Manuals Home
- Nissan Versa Owners Manual
- Nissan Versa Service Manual
- Video Guides
- Questions & Answers
- External Resources
- Latest Updates
- Most Popular
- Sitemap
- Search the site
- Privacy Policy
- Contact Us

0.0073