Nissan Versa (N17): Floor trim
Exploded View
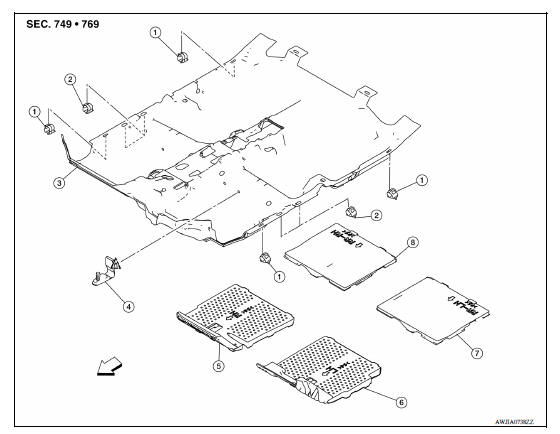
1. Harness clip A 2. Harness clip B 3. Floor carpet
4. Carpet hook 5. Front floor spacer (RH) 6. Front floor spacer (LH)
7. Rear floor spacer (LH) 8. Rear floor spacer (RH)
 Front
Front
 Clip
Clip
Removal and Installation
REMOVAL
- Remove front seat assemblies (LH/RH). Refer to SE "DRIVER SIDE : Removal and Installation".
- Remove rear seat cushion. Refer to SE "Removal and Installation - Seat Cushion Assembly".
- Remove center console lower. Refer to IP "Removal and Installation".
- Remove dash side finishers (LH/RH). Refer to INT "DASH SIDE FINISHER : Removal and Installation".
- Remove center pillar lower finishers (LH/RH). Refer to INT "CENTER PILLAR LOWER FINISHER : Removal and Installation".
- Disconnect diagnosis sensor unit. Refer to SR "Removal and Installation".
- Remove shift selector assembly.
- 5MT: Refer to TM "Removal and Installation".
- 4AT: Refer to TM "Removal and Installation"
- CVT: Refer to TM, "Removal and Installation"
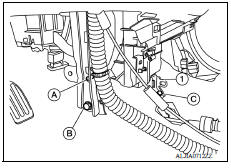
- Remove A/C unit assembly bolt (C) and bracket (1) from vehicle.
- Remove instrument panel lower bracket bolt (B) and screw (A) and reposition bracket as necessary to remove floor carpet.
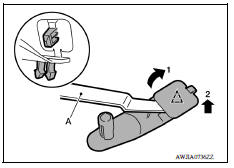
10. Release carpet hook clip with a suitable tool (A) and remove carpet hook.
 : Clip
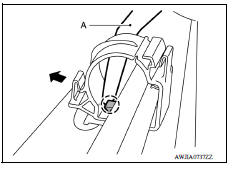
11. Release pawl using a suitable tool (A) and open the harness clip.
 : Pawl
12. Remove floor carpet.
INSTALLATION
Installation is in the reverse order of removal.
 Rear parcel shelf finisher
Exploded View 1. High-mounted stop lamp 2. Rear parcel shelf finisher 3. Seat belt finisher 4. Seatback latch cover 5. Top tether strap anchor 6. Top tether strap anchor finisher Front Paw ...
Headlining
Exploded View 1. Headlining assembly 2. Sun visor assembly (RH) 3. Sun visor assembly (RH) 4. Map lamp (if equipped) 5. Sun visor holder (LH) 6. Sun visor assembly (LH) 7. Microphone finisher ...
Other materials:
Before starting the engine
Make sure the area around the vehicle is
clear.
Check fluid levels such as engine oil, coolant,
brake and clutch fluid (if so equipped),
and windshield-washer fluid as frequently as
possible, or at least whenever you refuel.
Check that all windows and lights are clean.
Visually insp ...
Explanation of scheduled maintenance items
The following descriptions are provided to give
you a better understanding of the scheduled
maintenance items that should be regularly
checked or replaced. The maintenance schedule
indicates at which mileage/time intervals each
item requires service.
In addition to scheduled maintenance, you ...
Categories
- Manuals Home
- Nissan Versa Owners Manual
- Nissan Versa Service Manual
- Video Guides
- Questions & Answers
- External Resources
- Latest Updates
- Most Popular
- Sitemap
- Search the site
- Privacy Policy
- Contact Us

0.0049