Nissan Versa (N17): Headlining
Exploded View
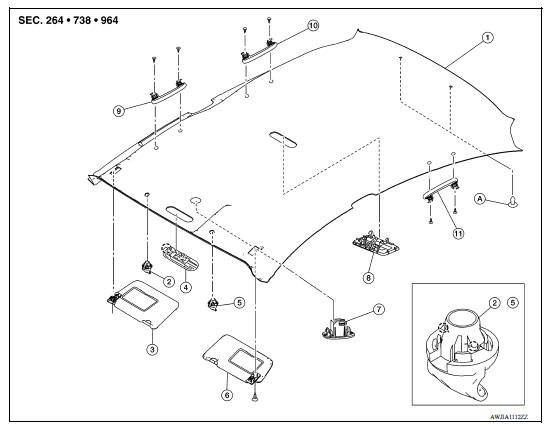
1. Headlining assembly 2. Sun visor assembly (RH) 3. Sun visor assembly (RH)
4. Map lamp (if equipped) 5. Sun visor holder (LH) 6. Sun visor assembly (LH)
7. Microphone finisher (if equipped) 8. Room lamp 9. Front assist grip (RH) (if
equipped)
10. Rear assist grip (RH) (if equipped) 11. Rear assist grip (LH) (if equipped)
A. Headlining clip
 Pawl
Pawl
Removal and Installation
REMOVAL
- Remove front pillar finishers (LH/RH). Refer to INT, "FRONT PILLAR FINISHER : Removal and Installation".
- Remove sun visor assembly screws and sun visor assemblies (LH/RH).
- Remove passenger seat. Refer to SE "DRIVER SIDE : Removal and
Installation".
NOTE: Remove passenger seat to make room for headlining removal out of the LH rear door.
- Remove lamp assemblies. Refer to INL "Removal and Installation" (Map Lamp, if equipped) and INL "Removal and Installation" (Interior Room Lamp).
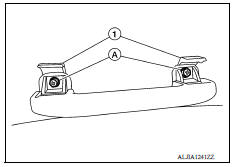
- Remove all the assist grips.
a. Release assist grip cover (1).
b. Remove assist grip bolts and assist grip.
- Remove center pillar upper finishers (LH/RH). Refer to INT "CENTER PILLAR UPPER FINISHER : Removal and Installation".
- Remove rear pillar finishers (LH/RH). Refer to INT "REAR PILLAR FINISHER : Removal and Installation".
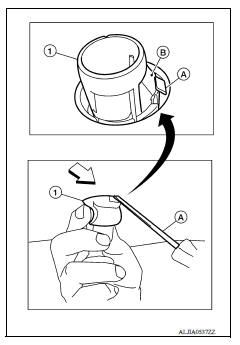
- Insert a suitable tool (A) at approximately a 30 degree angle into the sun visor holder notch on the front of the sun visor holder (1) and press in the locking tab (B) to release it. While holding in lock tab (B), rotate the sun visor holder (1) 90 degrees to release it from the headlining.
CAUTION: Do not force the sun visor holder when removing as the locking tab may be damaged if the suitable tool is not positioned correctly.
NOTE: If the sun visor holder (1) does not fully rotate, make sure that the suitable tool (A) is pressing in on the locking tab (B) and is not positioned under locking tab (B). Reinsert the suitable tool (A) as necessary to release the locking tab (B).
- Remove headlining clips.
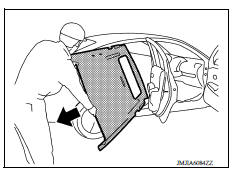
- Remove headlining assembly through the rear door.
CAUTION:
- Two people are required for removal to prevent damage to headlining.
- Apply protective tape to the portion where contact may occur during work.
- Do not bend headlining when removing.
INSTALLATION
Installation is in the reverse order of removal.
CAUTION:
- When installing headlining, start by installing both sun visor holders and headlining clips in order to keep the headlining in position.
- Do not bend headlining when installing.
- Be careful that the surface is not wrinkled when installing.
TRUNK ROOM TRIM
Exploded View
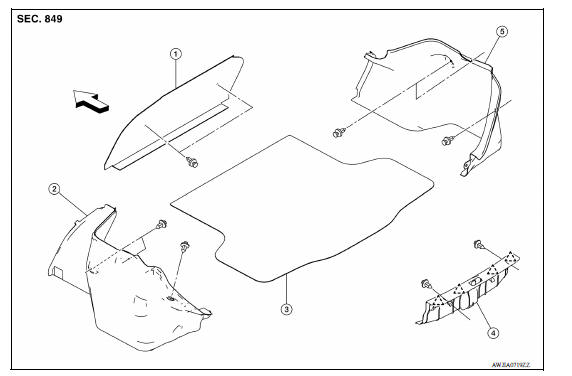
1. Trunk front finisher (if equipped) 2. Trunk side finisher (LH) 3. Trunk
floor carpet
4. Trunk rear plate 5. Trunk side finisher (RH)
 Pawl
Pawl
 Front
Front
 Floor trim
Exploded View 1. Harness clip A 2. Harness clip B 3. Floor carpet 4. Carpet hook 5. Front floor spacer (RH) 6. Front floor spacer (LH) 7. Rear floor spacer (LH) 8. Rear floor spacer (RH) Fro ...
Trunk rear plate
TRUNK REAR PLATE : Removal and Installation REMOVAL Fully open trunk lid. Remove trunk floor carpet. Remove trunk rear plate clips (A). 4. Release trunk ...
Other materials:
Precautions
Precaution for Supplemental Restraint System
(SRS) "AIR BAG" and "SEAT BELT PRE-TENSIONER"
The Supplemental Restraint System such as "AIR BAG" and "SEAT BELT PRE-TENSIONER",
used along
with a front seat belt, helps to reduce the risk or severity of injury to the
driver and ...
Shift position indicator circuit
Component Parts Function Inspection
1.CHECK SHIFT POSITION INDICATOR
Start the engine.
Shift selector lever.
Check that the selector lever position and the shift position indicator
on the combination meter are identical.
Is the inspection result normal?
YES >> INSPECTION END
N ...
Categories
- Manuals Home
- Nissan Versa Owners Manual
- Nissan Versa Service Manual
- Video Guides
- Questions & Answers
- External Resources
- Latest Updates
- Most Popular
- Sitemap
- Search the site
- Privacy Policy
- Contact Us

0.0051