Nissan Versa (N17): Trunk rear plate
TRUNK REAR PLATE : Removal and Installation
REMOVAL
- Fully open trunk lid.
- Remove trunk floor carpet.
- Remove trunk rear plate clips (A).
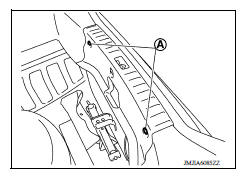
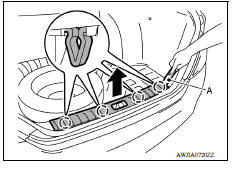
4. Release trunk rear plate pawls using a suitable tool (A) and remove trunk rear plate as shown.
INSTALLATION
Installation is in the reverse order of removal.
CAUTION: When installing trunk rear plate, make sure that clips are securely pressed into body holes.
TRUNK FRONT FINISHER
TRUNK FRONT FINISHER : Removal and Installation
REMOVAL
- Fully open trunk lid.
- Remove trunk floor carpet.
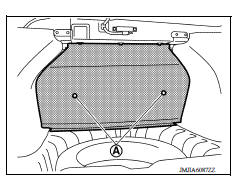
- Remove trunk front finisher clips (A) and trunk front finisher.
INSTALLATION
Installation is in the reverse order of removal.
CAUTION: When installing trunk front finisher, make sure that clips are securely pressed into body holes.
TRUNK SIDE FINISHER
TRUNK SIDE FINISHER : Removal and Installation
REMOVAL
- Remove trunk rear plate. Refer to INT "TRUNK REAR PLATE : Removal and Installation".
- Remove trunk front finisher. Refer to INT "TRUNK FRONT FINISHER : Removal and Installation".
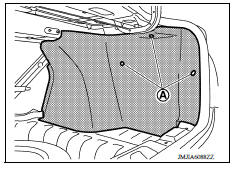
- Remove trunk side finisher clips (A) and trunk side finisher.
INSTALLATION
Installation is in the reverse order of removal.
CAUTION: Make sure the rear end of trunk side finisher is positioned behind the trunk weatherstrip.
 Headlining
Exploded View 1. Headlining assembly 2. Sun visor assembly (RH) 3. Sun visor assembly (RH) 4. Map lamp (if equipped) 5. Sun visor holder (LH) 6. Sun visor assembly (LH) 7. Microphone finisher ...
Trunk lid trim
Exploded View 1. Trunk lid assembly 2. Trunk lid finisher Removal and Installation REMOVAL Fully open trunk lid. Remove emergency release handle. Refer to DLK "EMERGENCY LEVER : Re ...
Other materials:
Camshaft valve clearance
Inspection and Adjustment
INSPECTION
Perform inspection as follows after removal, replacement or installation of
camshaft or valverelated parts, or if
there are unusual engine conditions regarding valve clearance.
Remove rocker cover.
Measure the valve clearance with the following proced ...
Lock-up control
LOCK-UP CONTROL : System Description
SYSTEM DIAGRAM
DESCRIPTION
Controls for improvement of the transmission efficiency by engaging the
torque converter clutch in the
torque converter and eliminating slip of the converter. Achieves comfortable
driving with slip control of the
t ...
Categories
- Manuals Home
- Nissan Versa Owners Manual
- Nissan Versa Service Manual
- Video Guides
- Questions & Answers
- External Resources
- Latest Updates
- Most Popular
- Sitemap
- Search the site
- Privacy Policy
- Contact Us

0.005