
Nissan Versa (N17): Map lamp
Exploded View
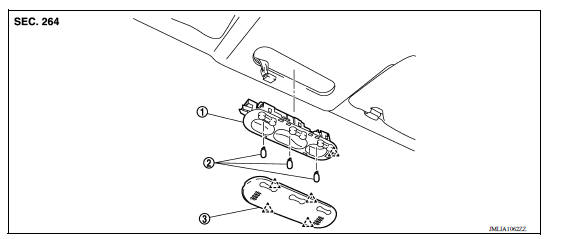
1. Map lamp bulb housing 2. Bulb 3. Lens
 Pawl
Pawl
Removal and Installation
WARNING: Do not touch bulb with your hand while it is on or right after being turned off. Burning may result.
CAUTION: Do not touch the glass surface of the bulb with bare hands or allow oil or grease to get on it to prevent damage to the bulb.
REMOVAL
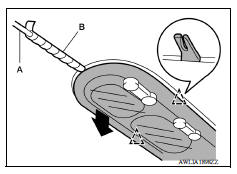
1. Release lens pawls using suitable tool (A) and remove.
CAUTION: Apply protect tape (B) on suitable tool (A).
 : Pawl
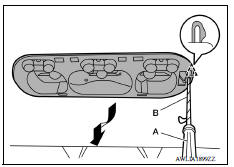
2. Release map lamp housing pawl using suitable tool (A).
CAUTION: Apply protect tape (B) on suitable tool (A).
 : Pawl
3. Disconnect the harness connector from map lamp and remove.
INSTALLATION
Installation is in the reverse order of removal.
Bulb Replacement
WARNING: Do not touch bulb with your hand while it is on or right after being turned off. Burning may result.
CAUTION:
- Do not touch the glass surface of the bulb with bare hands or allow oil or grease to get on it to prevent damage to the bulb.
- Leaving the bulb removed from housing for a long period of time can deteriorate performance of the lens and reflector (causing dirt or clouding). Always prepare a new bulb and have it on hand when replacing the bulb.
MAP LAMP BULB
Removal
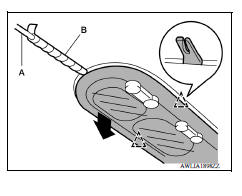
1. Release lens pawls using suitable tool (A) and remove.
CAUTION: Apply protect tape (B) on suitable tool (A).
 Pawl
Pawl
2. Remove the bulb.
Installation
Installation is in the reverse order of removal.
 Push-button ignition switch illumination
circuit
Push-button ignition switch illumination
circuit
Description Provides the power supply and the ground to control the push-button ignition switch illumination. ...

Other materials:
Installing front license plate
Use the following steps to mount the front license
plate:
Before mounting the license plate, confirm that
the following parts are enclosed in the plastic
bag:
License plate bracket
License plate bracket screws x 2
Screw grommets x 2
1. Hold the license plate bracket 1 and make
a ...
Oil pan (lower)
Exploded View
1. Rear oil seal 2. Oring 3. Oil pan (upper) 4. Oil pump chain tensioner
(for oil pump drive chain) 5. Oil pump drive chain 6. Crankshaft key 7.
Crankshaft sprocket 8. Oil pump sprocket 9. Oil pump 10. Oring 11. Oring 12.
Oil pan drain plug 13. Drain plug washer 14. Oil pan ...
Categories
- Manuals Home
- Nissan Versa Owners Manual
- Nissan Versa Service Manual
- Video Guides
- Questions & Answers
- External Resources
- Latest Updates
- Most Popular
- Sitemap
- Search the site
- Privacy Policy
- Contact Us

0.0068