Nissan Versa (N17): Seat belt retractor
SEAT BELT RETRACTOR : Removal and Installation
REMOVAL
CAUTION: Before servicing, turn ignition switch OFF, disconnect battery negative terminal and wait at least three minutes.
- Disconnect both the negative and positive battery cables, then wait at least three minutes. Refer to PG "Removal and Installation".
- Remove D-ring anchor.
a. Slide front seat to the full forward position.
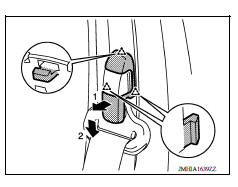
b. Pull seat belt adjuster cover in direction indicated by arrows as shown. Remove seat belt adjuster cover.
 : Pawl

c. Remove D-ring anchor bolt.
- Remove outer anchor bolt and outer anchor.
- Remove seat belt pre-tensioner retractor.
a. Remove center pillar lower finisher. Refer to INT "CENTER PILLAR LOWER FINISHER : Removal and Installation".
b. Disconnect the harness connector from the seat belt pre-tensioner.
CAUTION:
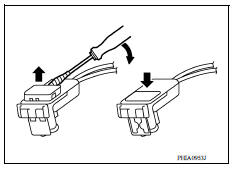
- For installing/removing seat belt pre-tensioner harness connector, insert thin screwdriver wrapped in tape into the notch, lift locking tab to unlock and then remove the connector.
- Install the pre-tensioner harness connector with the locking tab raised, and then push locking tab into the connector to lock.

c. Remove seat belt pre-tensioner retractor anchor bolt and screw.
5. Remove seat belt adjuster.
a. Remove center pillar upper finisher. Refer to INT "CENTER PILLAR UPPER FINISHER : Removal and Installation".
b. Remove seat belt adjuster anchor bolts.
INSTALLATION
Installation is in the reverse order of removal.
SEAT BELT BUCKLE
SEAT BELT BUCKLE : Removal and Installation
REMOVAL
- Remove front seat assembly. Refer to SE "DRIVER SIDE : Removal and
Installation".
CAUTION: When removing and installing, use shop cloths to protect parts from damage.
- Disconnect the harness connector from the seat belt buckle and release the harness clip(s).
- Remove seat belt buckle anchor bolt and seat belt buckle.
INSTALLATION
Installation is in the reverse order of removal.
REAR SEAT BELT
Exploded View

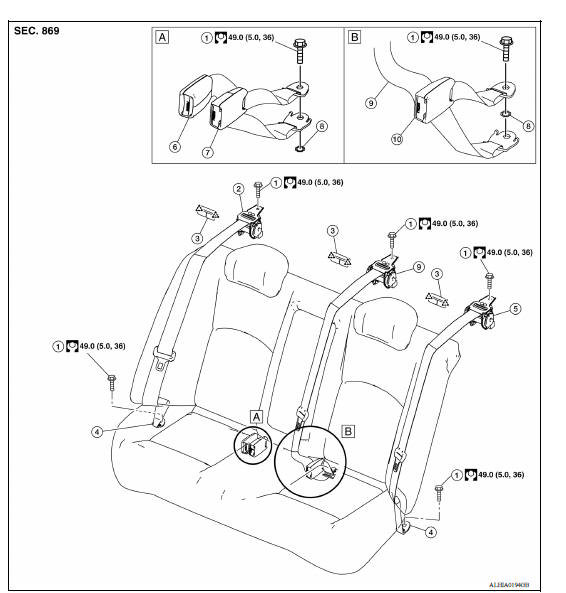
1. Anchor bolt 2. Outer seat belt retractor (RH) 3. Seat belt finisher
4. Outer anchor 5. Outer seat belt retractor (LH) 6. Seat belt buckle (RH)
7. Seat belt buckle (center) 8. Retaining washer 9. Seat belt retractor (center)
10. Seat belt buckle (LH)  Pawl
Pawl
SEAT BELT RETRACTOR
SEAT BELT RETRACTOR : Removal and Installatio
REMOVAL
1. Remove outer anchor.
a. Remove rear seat cushion. Refer to SE "Removal and Installation - Seat Cushion Assembly".
b. Remove outer anchor bolt.
2. Remove outer seat belt retractor.
a. Remove seat belt finisher and rear parcel shelf finisher. Refer to INT "REAR PILLAR FINISHER : Removal and Installation".
b. Remove seat belt retractor anchor bolt.
INSTALLATION
Installation is in the reverse order of removal.
SEAT BELT BUCKLE AND TONGUE
SEAT BELT BUCKLE AND TONGUE : Removal and Installation
REMOVAL
- Remove rear seat cushion. Refer to SE "Removal and Installation - Seat Cushion Assembly".
- Remove seat belt buckle and tongue anchor bolt.
- Remove seat belt buckle and tongue.
INSTALLATION
Installation is in the reverse order of removal.
 Component inspection
Inspection AFTER A COLLISION WARNING: Inspect all seat belt assemblies including retractors and attaching hardware after any collision. NISSAN/INFINITI recommends that all seat belt assembli ...
Other materials:
Main power supply and ground circuit
Diagnosis Procedure
1.CHECK TCM POWER CIRCUIT 1
Turn the ignition switch OFF.
Disconnect the TCM connector.
Check the voltage between the TCM harness connector terminals and
ground.
Is the inspection result normal?
YES >> GO TO 2.
NO >> GO TO 4.
2.CHECK TCM POWER ...
Differential side oil seal
Exploded View
1. Transaxle assembly 2. Differential side oil seal (left side) 3.
Differential side oil seal (right side)
Front Genuine
NISSAN Matic S ATF
Removal and Installation
NOTE:
When removing components such as hoses, tubes/lines, etc., cap or plug openings
to prevent fluid fr ...
Categories
- Manuals Home
- Nissan Versa Owners Manual
- Nissan Versa Service Manual
- Video Guides
- Questions & Answers
- External Resources
- Latest Updates
- Most Popular
- Sitemap
- Search the site
- Privacy Policy
- Contact Us
0.0122

