Nissan Versa (N17): Trunk lid lock
TRUNK LID LOCK : Removal and Installation
REMOVAL
1. Remove trunk lid finisher (if equipped). Refer to INT "Removal and Installation".
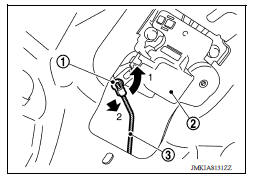
2. Release rod holder (1) by lifting upward, and then separate trunk lid lock rod (3) from trunk lid lock assembly (2).
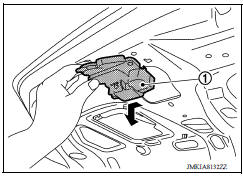
3. Remove trunk lid lock assembly bolts.
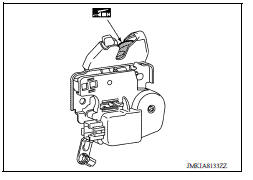
4. Disconnect harness connector and then remove trunk lid lock assembly (1).
INSTALLATION
Installation is in the reverse order of removal.
CAUTION:
- After installation, check trunk lid open/close, lock/unlock operation.
- Check trunk lid lock assembly for poor lubrication. Apply a suitable multi-purpose grease to trunk lid lock if necessary.
 Outside handle
OUTSIDE HANDLE : Removal and Installation REMOVAL 1. Fully close rear door glass. 2. Remove rear door finisher. Refer to INT "Removal and Installation". 3. Remove sealing screen. NOTE ...
Trunk lid opener handle
TRUNK LID OPENER HANDLE : Removal and Installation REMOVAL 1. Remove front kicking plate (LH). Refer to INT "KICKING PLATE INNER : Removal and Installation". 2. Disengage pawl using a s ...
Other materials:
Power door lock system symptoms
Symptom Table
DOOR LOCK/UNLOCK FUNCTION MALFUNCTION
NOTE:
Before performing the diagnosis in the following table, check "WORK
FLOW". Refer to DLK "Work
Flow".
Check that vehicle is under the condition shown in "Conditions of
vehicle" before starting diagnosis, and
check e ...
Diagnosis and repair workflow
Work Flow
OVERALL SEQUENCE
DETAILED FLOW
1.GET INFORMATION FOR SYMPTOM
Get the detailed information from the customer about the symptom (the
condition and the environment when
the incident/malfunction occurred).
>> GO TO 2
2.CHECK DTC
1. Check DTC for BCM.
2. Perform the followi ...
Categories
- Manuals Home
- Nissan Versa Owners Manual
- Nissan Versa Service Manual
- Video Guides
- Questions & Answers
- External Resources
- Latest Updates
- Most Popular
- Sitemap
- Search the site
- Privacy Policy
- Contact Us

0.0545