Nissan Versa (N17): Cooling fan
Exploded View
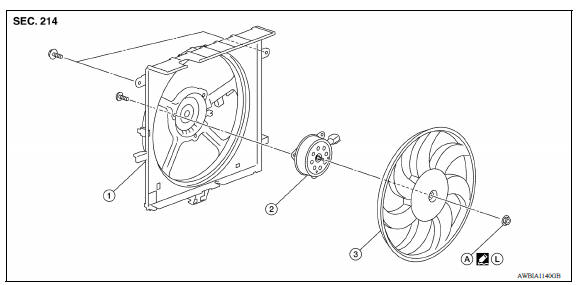
1. Fan shroud 2. Fan motor 3. Cooling fan A. Cooling fan nut L. Genuine NISSAN high strength locking sealant
Removal and Installation
REMOVAL
WARNING:
Do not remove the radiator cap when the engine is hot. Serious burns could occur from highpressure engine coolant escaping from the radiator. Wrap a thick cloth around the radiator cap. Slowly turn it a quarter of a turn to release builtup pressure. Carefully remove radiator cap by turning it all the way.
NOTE:
When removing components such as hoses, tubes/lines, etc., cap or plug openings to prevent fluid from spilling.
- Partially drain engine coolant from radiator.
CAUTION:
- Perform this step when the engine is cold.
- Do not spill engine coolant on drive belt.
- Remove air duct (inlet).
- Disconnect battery negative terminal.
- Loosen the following from the radiator core support (upper): a. Air bag harness b. Hood lock cable c. Radiator cap adapter d. Horn harness
- Remove radiator hose (upper) from water outlet.
- Disconnect harness connector from fan motor, and move harness aside.
- Disconnect reservoir tank hose, and remove reservoir tank.
- Remove radiator core support (upper).
- Remove radiator hose (upper) from radiator.
- Remove cooling fan assembly.
CAUTION:
Be careful not to damage or scratch the radiator.
INSTALLATION
Installation is in the reverse order of removal.
CAUTION:
Only use Genuine NISSAN parts for the fan shroud bolt.
NOTE:
Cooling fan is controlled by ECM.
Disassembly and Assembly
DISASSEMBLY
- Remove cooling fan nut, and then remove the cooling fan.
- Remove fan motor.
INSPECTION AFTER DISASSEMBLY
Cooling fan and shroud Inspect cooling fan and shroud for nicks, cracks, breaks and warping. Replace if necessary.
ASSEMBLY
Assembly is in the reverse order of disassembly.
CAUTION:
Apply Genuine NISSAN high strength thread locking sealant on fan motor shaft.
 Radiator
Water pump
Exploded View 1. Gasket 2. Water pump 3. Water pump pulley Removal and Installation REMOVAL CAUTION: Do not remove the radiator cap when the engine is hot. Serious burns could occur from hi ...
Other materials:
Gear oil
Inspection
OIL LEAKAGE
Make sure that gear oil is not leaking from transaxle or around it.
OIL LEVEL
Remove filler plug (1) and gasket from transaxle case.
Check the oil level from filler plug hole as shown. CAUTION:
Do not start engine while checking oil level.
Install a new gas ...
P0982 Shift solenoid D
DTC Logic
DTC DETECTION LOGIC
DTC
Trouble diagnosis name
DTC detection condition
Possible causes
P0982
Shift Solenoid D Control Circuit
Low
The following diagnosis conditions
are met, and the current
monitor reading of the TCM
high clutch/low & revers ...
Categories
- Manuals Home
- Nissan Versa Owners Manual
- Nissan Versa Service Manual
- Video Guides
- Questions & Answers
- External Resources
- Latest Updates
- Most Popular
- Sitemap
- Search the site
- Privacy Policy
- Contact Us

0.0065