Nissan Versa (N17): Side curtain air bag module
Exploded View
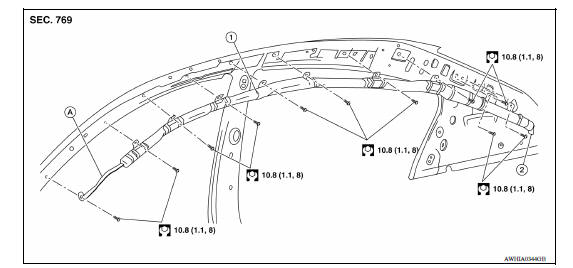
1. Side curtain air bag module 2. Side curtain air bag module connector A. Adhesive tape area
Removal and Installation
REMOVAL
CAUTION:
- Before servicing, turn ignition switch OFF, disconnect both battery terminals and wait at least three minutes.
- Do not use air tools or electric tools for servicing.
- Always work from the side of air bag module. Do not work from the front of it.
- Always place the curtain air bag module with air bag deployment side facing upward.
- Do not cause impact to the air bag module by dropping etc. Replace the air bag module if it has been dropped or sustained an impact.
- Disconnect the negative and positive battery terminals, then wait at least three minutes. Refer to PG "Removal and Installation".
- Remove the headlining. Refer to INT "Removal and Installation".
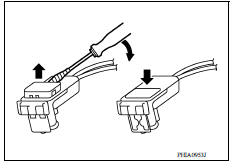
- Disconnect the harness connector from the side curtain air bag module. For installing/removing direct-connect SRS connectors, refer to SRC"SRS Component Connectors".
- Remove the bolts and release the adhesive tape, then remove the side curtain air bag module.
INSTALLATION
Installation is in the reverse order of removal.
Make sure the teather in the adhesive tape area is securely attached to the front pillar before installing pillar finisher.
CAUTION:
- Be careful not to damage the air bag harness.
- After the work is completed, make sure no system malfunction is detected by air bag warning lamp.
- In case a malfunction is detected by the air bag warning lamp, reset by the self-diagnosis function and delete the memory by CONSULT.
- If a malfunction is still detected after the above operation,
perform self-diagnosis to repair malfunctions.
Refer to SRC "Trouble Diagnosis with CONSULT".
- Make sure the side curtain air bag module is not twisted at any point along the vehicle when installed.
 Passenger air bag module
Exploded View 1. Passenger air bag module 2. Instrument panel assembly Pawl Removal and Installation WARNING: Before servicing, turn ignition switch OFF, disconnect both the battery ne ...
Side air bag module
Removal and Installation REMOVAL WARNING: Do not leave any objects (screwdrivers, tools, etc.) on the seat during seatback repair. It can lead to personal injury if the side air bag should accid ...
Other materials:
Oil pan (lower)
Exploded View
1. Rear oil seal 2. Oring 3. Oil pan (upper) 4. Oil pump chain tensioner
(for oil pump drive chain) 5. Oil pump drive chain 6. Crankshaft key 7.
Crankshaft sprocket 8. Oil pump sprocket 9. Oil pump 10. Oring 11. Oring 12.
Oil pan drain plug 13. Drain plug washer 14. Oil pan ...
P0733 3GR Incorrect ratio
Description
This malfunction is detected when the A/T does not shift into 3GR position as
instructed by TCM. This is not
only caused by electrical malfunction (circuits open or shorted) but by
mechanical malfunction such as control
valve sticking, improper solenoid valve operation, etc.
DTC ...
Categories
- Manuals Home
- Nissan Versa Owners Manual
- Nissan Versa Service Manual
- Video Guides
- Questions & Answers
- External Resources
- Latest Updates
- Most Popular
- Sitemap
- Search the site
- Privacy Policy
- Contact Us

0.0067