Nissan Versa (N17): Door parting seal
Exploded View
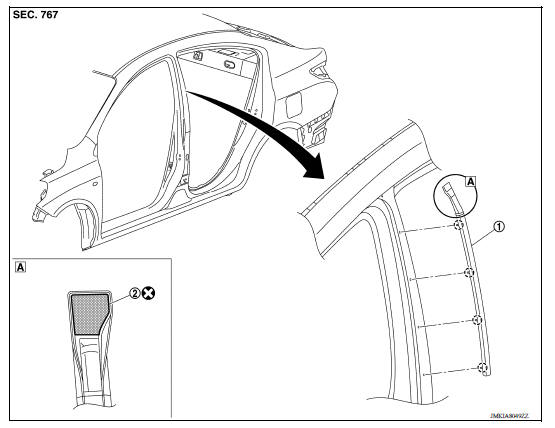
1. Door parting seal 2. Double-sided tape [t: 1.6 mm (0.065 in)]  Clip
Clip
Removal and Installation
REMOVAL
1. Open front door and rear door.
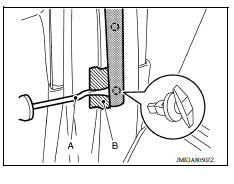
2. Release door parting seal clips using a suitable tool (A).
 : Clip
CAUTION: Apply protective tape (B) on body to protect the painted surface from damage.
3. Remove door parting seal.
INSTALLATION
Installation is in the reverse order of removal.
CAUTION:
- Always replace double-sided tape with a new tape if door parting seal is reused.
- Do not wash the vehicle within 24 hours after installing so as to keep adhesive dry.
 Trunk lid finisher
Exploded View 1. Trunk lid finisher 2. Emblem 3. Rear view camera (if equipped) Pawl Clip Removal and Installation REMOVAL 1. Remove trunk lid finisher inner. Refer to INT "Removal and ...
Rear spoiler
Exploded View 1. Rear spoiler 2. High-mounted stop lamp harness connector 3. Harness grommet Removal and Installation Removal 1. Remove trunk lid finisher (if equipped). Refer to EXT &qu ...
Other materials:
Wiper and washer switch
Switch operation
Type A (if so equipped)
The windshield wiper and washer operates when
the ignition switch is in the ON position.
Push the lever down to operate the wiper at the
following speed:
Intermittent (INT) - intermittent operation
can be adjusted by turning the knob toward
...
Multiport fuel injection system
MULTIPORT FUEL INJECTION SYSTEM : System Diagram
MULTIPORT FUEL INJECTION SYSTEM : System
Description
INPUT/OUTPUT SIGNAL CHART
Sensor
Input signal to ECM
ECM function
Actuator
Crankshaft position sensor (POS)
Engine speed*4
Piston position
Fuel injection & ...
Categories
- Manuals Home
- Nissan Versa Owners Manual
- Nissan Versa Service Manual
- Video Guides
- Questions & Answers
- External Resources
- Latest Updates
- Most Popular
- Sitemap
- Search the site
- Privacy Policy
- Contact Us

0.005