Nissan Versa (N17): Audio unit
Removal and Installation
REMOVAL
1. Remove cluster lid C. Refer to IP "Removal and Installation".
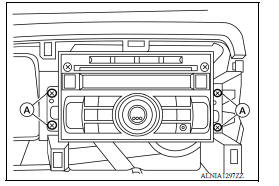
2. Remove the audio unit screws (A).
3. Pull the audio unit out.
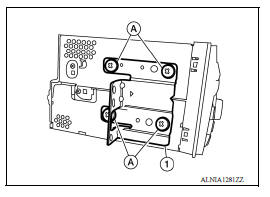
4. Disconnect the harness connectors from the audio unit and remove.
5. Remove the audio unit bracket screws (A) and the audio unit bracket (1) from each side of the audio unit (if necessary).
INSTALLATION
Installation is in the reverse order of removal.
 Normal operating condition
Description The majority of the audio troubles are the result of outside causes (bad CD, electromagnetic interference, etc.). NOISE The following noise results from variations in field strengt ...
Front door speaker
Removal and Installation REMOVAL 1. Remove the front door finisher. Refer to INT "Removal and Installation". 2. Remove the front door speaker screws (A). 3. Disconnect the harness conn ...
Other materials:
P0744 Torque converter
Description
This DTC is detected when the torque converter clutch solenoid valve is
electrically normal but the torque converter
clutch does not engage. This is not due to an electrical malfunction (circuit
open or shorted), but is
instead due to a mechanical malfunction (sticking of the cont ...
Automatic door lock/unlock function
AUTOMATIC DOOR LOCK/UNLOCK FUNCTION
: System Diagram
AUTOMATIC DOOR LOCK/UNLOCK FUNCTION
: System Description
DOOR LOCK FUNCTION
The door lock and unlock switch (driver side) is built into power window
main switch.
The door lock and unlock switch (passenger side) is on door trim. ...
Categories
- Manuals Home
- Nissan Versa Owners Manual
- Nissan Versa Service Manual
- Video Guides
- Questions & Answers
- External Resources
- Latest Updates
- Most Popular
- Sitemap
- Search the site
- Privacy Policy
- Contact Us

0.0048