Nissan Versa (N17): Front door speaker
Removal and Installation
REMOVAL
1. Remove the front door finisher. Refer to INT "Removal and Installation".
2. Remove the front door speaker screws (A).
3. Disconnect the harness connector from front door speaker (1) and remove.
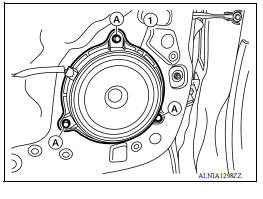
INSTALLATION
Installation is in the reverse order of removal.
 Audio unit
Removal and Installation REMOVAL 1. Remove cluster lid C. Refer to IP "Removal and Installation". 2. Remove the audio unit screws (A). 3. Pull the audio unit out. 4. Disconnect the harn ...
Rear door speaker
Removal and Installation REMOVAL 1. Remove the rear door finisher. Refer to INT "Removal and Installation". 2. Remove the rear door speaker screws (A). 3. Disconnect the harness connecto ...
Other materials:
Exterior front
1. Engine hood
2. Windshield
3. Wiper and washer switch
4. Power windows (if so equipped)
5. Door locks. NISSAN Intelligent Key
(if so equipped). Key fob (if so equipped). Keys
6. Mirrors
7. Tire pressure. Flat tire. Tire chains
8. Headlight and turn signal switch. Replacing bulbs
9. Fo ...
Interior lights
The interior light has a three-position switch and
operates regardless of ignition switch position.
When the switch is in the ON position 1 , the
interior lights illuminate, regardless of door position.
The lights will go off after a period of time
unless the ignition switch is placed i ...
Categories
- Manuals Home
- Nissan Versa Owners Manual
- Nissan Versa Service Manual
- Video Guides
- Questions & Answers
- External Resources
- Latest Updates
- Most Popular
- Sitemap
- Search the site
- Privacy Policy
- Contact Us

0.0046