Nissan Versa (N17): Rear door speaker
Removal and Installation
REMOVAL
1. Remove the rear door finisher. Refer to INT "Removal and Installation".
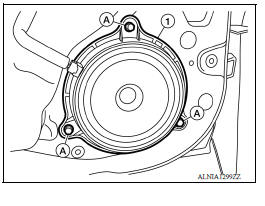
2. Remove the rear door speaker screws (A).
3. Disconnect the harness connector from rear door speaker (1) and remove.
INSTALLATION
Installation is in the reverse order of removal.
 Front door speaker
Removal and Installation REMOVAL 1. Remove the front door finisher. Refer to INT "Removal and Installation". 2. Remove the front door speaker screws (A). 3. Disconnect the harness conn ...
Roof antenna
Exploded View 1. Antenna mast 2. Antenna base Removal and Installation REMOVAL 1. Remove the headlining. Refer to INT "Removal and Installation". 2. Disconnect the antenna cable. 3 ...
Other materials:
U1000 Can comm circuit
Description
CAN (Controller Area Network) is a serial communication line for real-time
application. It is an on-vehicle multiplex
communication line with high data communication speed and excellent malfunction
detection ability.
Many electronic control units are equipped onto a vehicle, and ...
Steering wheel turning force is heavy or light
Description
Steering wheel turning force is heavy or light.
Diagnosis Procedure
1.PERFORM SELF-DIAGNOSIS
With CONSULT
Turn the ignition switch OFF to ON.
Perform "EPS" self-diagnosis.
Is any DTC detected?
YES >> Check the DTC. Refer to STC "DTC Index".
NO >> GO ...
Categories
- Manuals Home
- Nissan Versa Owners Manual
- Nissan Versa Service Manual
- Video Guides
- Questions & Answers
- External Resources
- Latest Updates
- Most Popular
- Sitemap
- Search the site
- Privacy Policy
- Contact Us

0.0064