Nissan Versa (N17): Center console lower
Removal and Installation
REMOVAL
- Remove center console assembly. Refer to IP "Removal and Installation".
- Remove center console lower.
a. Place front seats in a full rearward position.
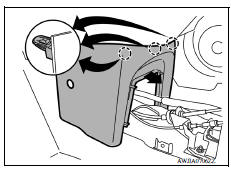
b. Remove center console lower clips (A).
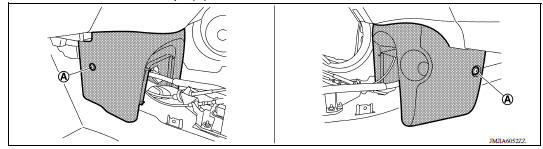
c. Disengage center console lower pawls and remove center console lower.
 : Pawl
INSTALLATION
Installation is in the reverse order of removal.
UNIT DISASSEMBLY AND ASSEMBLY
 Center console assembly
Exploded View 1. M/T console boot (M/T models) 2. Center console assembly Removal and Installation REMOVAL Move shift selector to "N" position (CVT models or A/T models). Remove shift ...
Center console assembly
Exploded View 1. Power socket 2. Center console assembly 3. Center console support 4. USB port and auxiliary jack Disassembly and Assembly DISASSEMBLY Remove the center console assembly. ...
Other materials:
Engine control system
ENGINE CONTROL SYSTEM : Component Parts Location
1. Mass air flow sensor
(with intake air temperature sensor)
2. Electric throttle control actuator
(with built in throttle position sensor
and throttle control motor)
3. EVAP canister purge volume control
solenoid valve
4. Cooling fan mot ...
Cooling fan control
Cooling fan control : system diagram
Cooling fan control : system description
INPUT/OUTPUT SIGNAL CHART
Sensor
Input signal to ECM
ECM function
Actuator
Crankshaft position sensor (POS)
Camshaft position sensor (PHASE)
Engine speed*1
Piston position
Cool ...
Categories
- Manuals Home
- Nissan Versa Owners Manual
- Nissan Versa Service Manual
- Video Guides
- Questions & Answers
- External Resources
- Latest Updates
- Most Popular
- Sitemap
- Search the site
- Privacy Policy
- Contact Us

0.006