Nissan Versa (N17): Cowl top
Exploded View
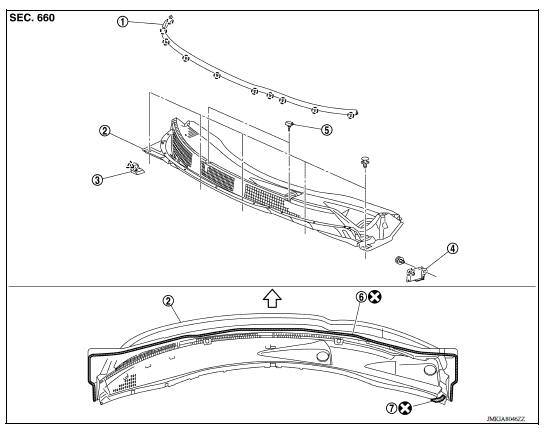
1. Cowl top cover seal 2. Cowl top cover 3. Air intake cover
4. Cowl cover one-way valve 5. Washer nozzle 6. EPT sealer [3.0 mm (0.118 in)]
7. EPT sealer [3.0 mm (0.118 in)]  Clip
Clip  Pawl
Pawl
 Fron
Fron
Removal and Installation
REMOVAL
1. Remove front wiper arms (LH/RH). Refer to WW "WIPER ARM : Removal and Installation".
2. Remove front fender covers (LH/RH). Refer to DLK "FENDER COVER : Removal and Installation".
3. Remove cowl top cover clips.
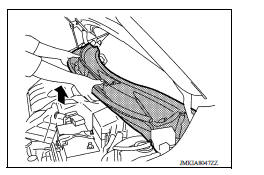
4. Pull forward to release cowl top cover from windshield glass.
CAUTION: When performing the procedure after removing cowl top cover, protect the lower of windshield glass with urethane, etc.
5. Disconnect the washer tube connector.
6. Remove cowl top cover.
7. Remove the following parts after removing cowl top cover.
- EPT sealer
- Cowl top cover seal
- Washer tube
- Washer nozzles (LH/RH). Refer to WW "WASHER NOZZLE : Removal and Installation".
INSTALLATION
Installation is in the reverse order of removal.
CAUTION:
- Always replace cowl top cover EPT sealer on rear of vehicle with a new one when installing old cowl top cover.
- After installing wiper arms, perform adjustment. Refer to WW-45, "WIPER ARM : Adjustment".
 Front grille
Exploded View 1. Front grille 2. Front emblem Pawl Removal and Installation REMOVAL 1. Remove front bumper fascia. Refer to EXT "Removal and Installation". 2. Remove front grill ...
Fender protector
Exploded View 1. Fender protector 2. J-nut Front Removal and Installation REMOVAL 1. Remove under cover. Refer to EXT"Removal and Installation". 2. Remove fender protector screws an ...
Other materials:
Idle air volume learning
Description
Idle Air Volume Learning is a function of ECM to learn the idle air volume
that keeps each engine idle speed
within the specific range. It must be performed under any of the following
conditions:
Each time electric throttle control actuator or ECM is replaced.
Idle speed or ...
Shift change control
Shift change control : system diagram
Shift change control : system description
The clutch is controlled with the optimum timing and oil pressure by the
engine speed, engine torque information,
etc.
Shift Change System Diagram
*1: Full phase real-time feedback control monitors m ...
Categories
- Manuals Home
- Nissan Versa Owners Manual
- Nissan Versa Service Manual
- Video Guides
- Questions & Answers
- External Resources
- Latest Updates
- Most Popular
- Sitemap
- Search the site
- Privacy Policy
- Contact Us

0.0048