Nissan Versa (N17): CSC (Concentric slave cylinder)
Exploded View
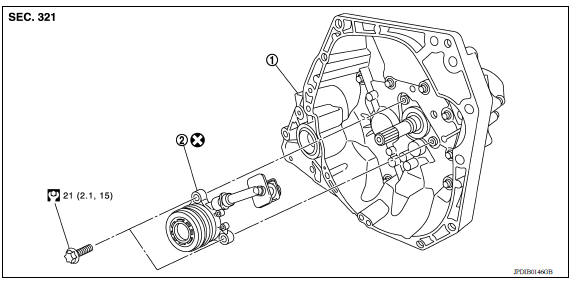
1. Transaxle assembly 2. CSC (concentric slave cylinder)
Removal and Installation
CAUTION:
- Do not reuse CSC (concentric slave cylinder). CSC slides back to the original position every time when removing transaxle assembly. At this time, dust on the sliding parts may damage the seal of CSC and may cause clutch fluid leakage.
- Do not disassemble CSC.
- Do not spill clutch fluid onto painted surfaces. If fluid spills, wipe up immediately and wash the affected area with water.
REMOVAL
- Remove transaxle assembly. Refer to TM, "Removal and Installation".
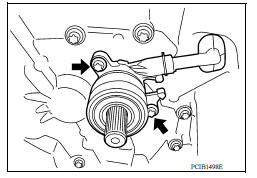
- Remove CSC bolts and the CSC from clutch housing.
INSTALLATION
1. Install CSC to clutch housing and then tighten CSC bolts to the specified torque.
CAUTION:
-
Do not reuse CSC.
-
Do not insert and operate CSC when transaxle is removed. Piston and stopper of CSC components may fall off.
2. Install transaxle assembly. Refer to TM, "Removal and Installation".
Inspection and Adjustment
INSPECTION AFTER INSTALLATION
Check for fluid leakage and fluid level. Refer to CL, "Inspection".
ADJUSTMENT AFTER INSTALLATION
Perform the air bleeding. Refer to CL, "Air Bleeding".
 Clutch piping
Exploded View 1. CSC (Concentric Slave Cylinder) 2. Clutch tube 3. Clutch damper 4. Bracket 5. Master cylinder Hydraulic Layout 1. Clutch tube 2. Lock pin 3. CSC (concentric slave cylinder ...
Clutch disc and clutch cover
Exploded View 1. Flywheel 2. Clutch disc 3. Clutch cover 4. Input shaft A. First step B. Final step : Apply lithium-based grease including molybdenum disulphide. ...
Other materials:
Seats
WARNING
Do not ride in a moving vehicle when
the seatback is reclined. This can be
dangerous. The shoulder belt will not
be against your body. In an accident,
you could be thrown into it and receive
neck or other serious injuries. You
could also slide under the lap belt and
recei ...
P1212 TCS communication line
Description
This CAN communication line is used to control the smooth engine operation
during the TCS operation. Pulse
signals are exchanged between ECM and "ABS actuator and electric unit (control
unit)".
Be sure to erase the malfunction information such as DTC not only for "ABS
actuat ...
Categories
- Manuals Home
- Nissan Versa Owners Manual
- Nissan Versa Service Manual
- Video Guides
- Questions & Answers
- External Resources
- Latest Updates
- Most Popular
- Sitemap
- Search the site
- Privacy Policy
- Contact Us

0.008