Nissan Versa (N17): P2096, P2097 A/F sensor 1
DTC Logic
DTC DETECTION LOGIC
| DTC No. | Trouble diagnosis (Trouble diagnosis content) | DTC detecting condition | Possible cause |
| P2096 | POST CAT FUEL TRIM SYS B1 (Post catalyst fuel trim systemtoo lean bank 1) | The output voltage computed by ECM from the A/F sensor 1 signa is shifts to the lean side for a specified period. |
|
| P2097 | POST CAT FUEL TRIM SYS B1 (Post catalyst fuel trim systemtoo rich bank 1) | The A/F signal computed by ECM from the A/F sensor 1 signal is shifts to the rich side for a specified period. |
DTC CONFIRMATION PROCEDURE
1.PRECONDITIONING
If DTC Confirmation Procedure has been previously conducted, always perform the following before conducting the next test.
- Turn ignition switch OFF and wait at least 10 seconds.
- Turn ignition switch ON.
- Turn ignition switch OFF and wait at least 10 seconds.
TESTING CONDITION: Before performing the following procedure, confirm that battery voltage is more than 11 V at idle.
>> GO TO 2.
2.PERFORM DTC CONFIRMATION PROCEDURE
- Clear the mixture ratio self-learning value. Refer to EC, "Work Procedure".
- Turn ignition switch OFF and wait at least 10 seconds.
- Restart engine and keep the engine speed between 3,500 and 4,000 rpm for 1 minute under no load.
- Let engine idle for 1 minute.
- Keep engine speed between 2,500 and 3,000 rpm for 20 minutes.
- Check 1st trip DTC.
Is 1st trip DTC detected?
YES >> Go to EC, "Diagnosis Procedure".
NO >> INSPECTION END
Diagnosis Procedure
1.CHECK GROUND CONNECTION
- Turn ignition switch OFF.
- Check ground connection E15. Refer to Ground Inspection in GI, "Circuit Inspection".
Is the inspection result normal?
YES >> GO TO 2.
NO >> Repair or replace ground connection.
2.RETIGHTEN A/F SENSOR 1 AND HEATED OXYGEN SENSOR 2
Loosen and retighten the A/F sensor 1 and heated oxygen sensor 2. Refer to EM, "Exploded View" and EX, "Exploded View".
>> GO TO 3.
3.CHECK FOR EXHAUST GAS LEAK
- Start engine and run it at idle.
- Listen for an exhaust gas leak before the three way catalyst 2.
Is exhaust gas leak detected?
YES >> Repair or replace.
NO >> GO TO 4.
4.CHECK FOR INTAKE AIR LEAK
- Start engine and run it at idle.
- Listen for an intake air leak after the mass air flow sensor.
Is intake air leak detected?
YES >> Repair or replace.
NO >> GO TO 5.
5.CLEAR THE MIXTURE RATIO SELF-LEARNING VALUE
- Clear the mixture ratio self-learning value. Refer to EC, "Work Procedure".
- Run engine for at least 10 minutes at idle speed.
Is the 1st trip DTC P0171 or P0172 detected? Is it difficult to start engine?
YES >> Perform trouble diagnosis for DTC P0171 or P0172. Refer to EC, "Diagnosis Procedure" or EC, "Diagnosis Procedure".
NO >> GO TO 6.
6.CHECK HARNESS CONNECTOR
- Turn ignition switch OFF.
- Disconnect A/F sensor 1 harness connector.
- Check harness connector for water.
Water should not exit.
Is the inspection result normal?
YES >> GO TO 7.
NO >> Repair or replace harness connector.
7.CHECK A/F SENSOR 1 POWER SUPPLY CIRCUIT
- Turn ignition switch ON.
- Check the voltage between A/F sensor 1 harness connector and ground.

Is the inspection result normal?
YES >> GO TO 9.
NO >> GO TO 8.
8.DETECT MALFUNCTIONING PART
- Check the following.
- IPDM E/R harness connector F42
- 20A fuse (No. 53)
- Harness for open or short between A/F sensor 1 and fuse
>> Repair or replace harness or connectors.
9.CHECK A/F SENSOR 1 INPUT SIGNAL CIRCUIT FOR OPEN AND SHORT
- Turn ignition switch OFF.
- Disconnect ECM harness connector.
- Check the continuity between A/F sensor 1 harness connector and ECM
harness connector.
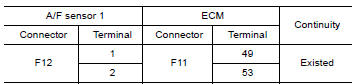
- Check the continuity between A/F sensor 1 harness connector and ground
or ECM harness connector
and ground.
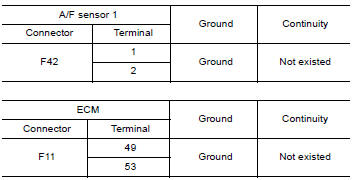
- Also check harness for short to power.
Is the inspection result normal?
YES >> GO TO 10.
NO >> Repair open circuit, short to ground or short to power in harness or connectors.
10.CHECK A/F SENSOR 1 HEATER
Refer to EC, "Component Inspection".
Is the inspection result normal?
YES >> GO TO 11.
NO >> GO TO 13.
11.CHECK HEATED OXYGEN SENSOR 2
Refer to EC, "Component Inspection".
Is the inspection result normal?
YES >> GO TO 12.
NO >> Replace malfunctioning heated oxygen sensor 2.
12.CHECK INTERMITTENT INCIDENT
Perform GI, "Intermittent Incident".
Is the inspection result normal?
YES >> GO TO 13.
NO >> Repair or replace.
13.REPLACE AIR FUEL RATIO (A/F) SENSOR 1
Replace air fuel ratio (A/F) sensor 1. Refer to EM, "Exploded View".
CAUTION:
- Discard any A/F sensor which has been dropped from a height of more than 0.5 m (19.7 in) onto a hard surface such as a concrete floor; use a new one.
- Before installing new A/F sensor, clean exhaust system threads using Oxygen Sensor Thread Cleaner [commercial service tool (J-43897-18 or J-43897-12)] and approved anti-seize lubricant (commercial service tool).
Do you have CONSULT?
YES >> GO TO 14.
NO >> GO TO 15.
14.CONFIRM A/F ADJUSTMENT DATA
With CONSULT
- Turn ignition switch ON.
- Select "A/F ADJ-B1" in "DATA MONITOR" mode with CONSULT.
- Make sure that "0.000" is displayed on CONSULT screen.
Is "0.000" displayed?
YES >> INSPECTION END
NO >> GO TO 15.
15.CLEAR THE MIXTURE RATIO SELF-LEARNING VALUE
Clear the mixture ratio self-learning value. Refer to EC, "Work Procedure".
Do you have CONSULT?
YES >> GO TO 16.
NO >> INSPECTION END
16.CONFIRM A/F ADJUSTMENT DATA
With CONSULT
- Turn ignition switch ON.
- Select "A/F ADJ-B1" in "DATA MONITOR" mode with CONSULT.
- Make sure that "0.000" is displayed on CONSULT screen.
>> INSPECTION END
 P1805 brake switch
Other materials:
Readiness for inspection/maintenance (I/M) test
Due to legal requirements in some states and
Canadian Provinces, your vehicle may be required
to be in what is called the "ready condition"
for an Inspection/Maintenance (I/M) test of
the emission control system.
The vehicle is set to the "ready condition" when it
is driven through certain d ...
Air conditioning cut control
AIR CONDITIONING CUT CONTROL : System Diagram
AIR CONDITIONING CUT CONTROL : System
Description
INPUT/OUTPUT SIGNAL CHART
Sensor
Input signal to ECM
ECM function
Actuator
Crankshaft position sensor (POS)
Camshaft position sensor (PHASE)
Engine speed*1
Pisto ...
Categories
- Manuals Home
- Nissan Versa Owners Manual
- Nissan Versa Service Manual
- Video Guides
- Questions & Answers
- External Resources
- Latest Updates
- Most Popular
- Sitemap
- Search the site
- Privacy Policy
- Contact Us

0.0062