Nissan Versa (N17): Door lock
DOOR LOCK : Removal and Installation
REMOVAL
1. Remove inside handle. Refer to DLK "INSIDE HANDLE : Removal and Installation".
2. Remove outside handle. Refer to DLK "OUTSIDE HANDLE : Removal and Installation".
3. Remove bolt (A) from the front door glass channel rear (1).
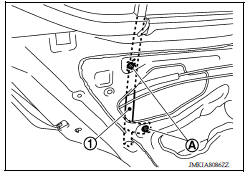
4. Disconnect the harness connector from door lock actuator.
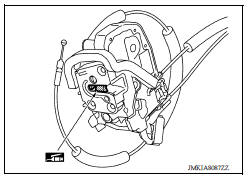
5. Remove door lock assembly bolts and door lock assembly.
INSTALLATION
Installation is in the reverse order of removal.
CAUTION:
- Do not reuse door lock assembly bolt. Always replace it with a new one when it is removed.
- After installation, check door open/close, lock/unlock operation.
- Check door lock cable is properly engaged with outside handle bracket.
- Check door lock assembly for poor lubrication. Apply a suitable multi-purpose grease to door lock if necessary.
 Outside handle
OUTSIDE HANDLE : Removal and Installation REMOVAL 1. Fully close the front door glass. 2. Remove front door finisher. Refer to INT "Removal and Installation". 3. Remove sealing screen. ...
Inside handle
INSIDE HANDLE : Removal and Installation REMOVAL 1. Remove rear door finisher. Refer to INT "Removal and Installation". 2. Remove upper side of sealing screen. NOTE: Cut the butyl tape ...
Other materials:
Additional service when replacing
TCM
Description
Always perform the following items when the TCM is replaced.
LOADING OF THE CALIBRATION DATA
The TCM acquires calibration data (individual characteristic value) of
each solenoid that is stored in the
ROM assembly (in the control valve). This enables the TCM to perform
accur ...
Disc rotor
DISC ROTOR : Inspection and Adjustment
INSPECTION
Appearance
Check surface of disc rotor for uneven wear, cracks, and serious damage.
Replace it if necessary. Refer to
BR "DISC ROTOR : Inspection and Adjustment".
Runout
Fix the disc rotor to the wheel hub and bearing assembly wi ...
Categories
- Manuals Home
- Nissan Versa Owners Manual
- Nissan Versa Service Manual
- Video Guides
- Questions & Answers
- External Resources
- Latest Updates
- Most Popular
- Sitemap
- Search the site
- Privacy Policy
- Contact Us

0.0053