Nissan Versa (N17): Inside handle
INSIDE HANDLE : Removal and Installation
REMOVAL
1. Remove rear door finisher. Refer to INT "Removal and Installation".
2. Remove upper side of sealing screen.
NOTE: Cut the butyl tape so that some parts of the butyl tape remain on the sealing screen, if the sealing screen is reused.
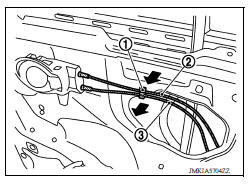
3. Disengage lock knob cable (2) and inside handle cable (3) from cable clip (1).
4. Remove inside handle bolt.
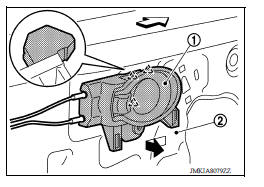
5. Disengage inside handle (1) from door panel (2) by sliding toward vehicle rear and then separating.
 : Pawl
 : Front
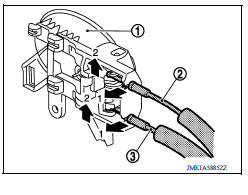
6. Disengage inside handle cable (3) and lock knob cable (2), and then remove inside handle (1).
INSTALLATION
Installation is in the reverse order of removal.
CAUTION: After installation, check door open/close, lock/unlock operation.
 Door lock
DOOR LOCK : Removal and Installation REMOVAL 1. Remove inside handle. Refer to DLK "INSIDE HANDLE : Removal and Installation". 2. Remove outside handle. Refer to DLK "OUTSIDE HANDL ...
Outside handle
OUTSIDE HANDLE : Removal and Installation REMOVAL 1. Fully close rear door glass. 2. Remove rear door finisher. Refer to INT "Removal and Installation". 3. Remove sealing screen. NOTE ...
Other materials:
NISSAN Voice Recognition System (if so equipped)
The NISSAN Voice Recognition system allows
hands-free operation of the systems equipped on
this vehicle, such as the phone and navigation
systems.
To operate NISSAN Voice Recognition, press
the button located on the steering
wheel.
When prompted, speak the command for the
system you wi ...
Removal and installation
ECM
Exploded View
1. ECM bracket 2. ECM
: Vehicle front
Removal and Installation
CAUTION: Perform ADDITIONAL SERVICE WHEN REPLACING ECM. Refer to
EC-122, "Work Procedure".
REMOVAL
Remove battery. Refer to PG, "Removal and Installation".
Remove IPDM E/R. Re ...
Categories
- Manuals Home
- Nissan Versa Owners Manual
- Nissan Versa Service Manual
- Video Guides
- Questions & Answers
- External Resources
- Latest Updates
- Most Popular
- Sitemap
- Search the site
- Privacy Policy
- Contact Us

0.005