Nissan Versa (N17): Front door finisher
Exploded View
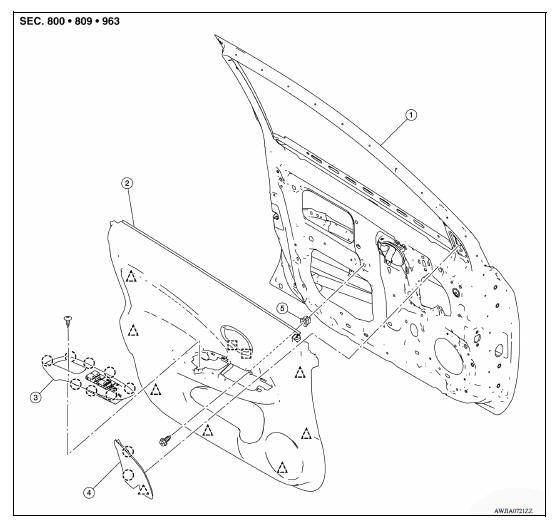
1. Front door panel 2. Front door finisher 3. Main power window and door
lock/
unlock switch finisher (if equipped)
4. Front door corner finisher 5. Grommet
 Metal clip
 Clip
Clip
 Pawl
Pawl
Removal and Installation
REMOVAL
- Fully open front door window.
- Remove front door corner finisher. Refer to MIR "FRONT DOOR CORNER FINISHER : Removal and Installation".
- Remove power window and door lock/unlock switch and finisher as an assembly (if equipped). Refer to PWC "Removal and Installation" (LH) or PWC "Removal and Installation" (RH).
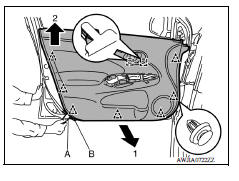
- Remove front door finisher.
a. Remove front door finisher bolt (A).

b. Release front door finisher clips and metal clips using a suitable tool (A) and remove front door finisher as shown.
 : Clip
 : Metal clip
CAUTION: Apply protective tape (B) on the door panel and/or door finisher to protect from damage.
INSTALLATION
Installation is in the reverse order of removal.
CAUTION: When installing front door finisher, make sure the clips and metal clips are securely pressed into door panel holes.
 Squeak and rattle trouble diagnoses
Rear door finisher
Exploded View 1. Rear door panel 2. Rear door finisher 3. Rear power window switch finisher (if equipped) 4. Grommet Clip Metal clip Pawl Removal and Installation REMOVAL Fully open r ...
Other materials:
Malfunction indicator lamp
Component Function Check
1.CHECK MIL FUNCTION
Turn ignition switch ON.
Make sure that MIL lights up.
Is the inspection result normal?
YES >> INSPECTION END
NO >> Go to EC, "Diagnosis Procedure".
Diagnosis Procedure
1.CHECK DTC
Check that DTC UXXXX is not display ...
Lock-up control
Lock-up control : system diagram
Lock-up control : system description
The torque converter clutch piston in the torque converter is engaged to
eliminate torque converter slip to
increase power transmission efficiency.
The torque converter clutch control valve operation is controlle ...
Categories
- Manuals Home
- Nissan Versa Owners Manual
- Nissan Versa Service Manual
- Video Guides
- Questions & Answers
- External Resources
- Latest Updates
- Most Popular
- Sitemap
- Search the site
- Privacy Policy
- Contact Us

0.0055