Nissan Versa (N17): EVAP leak check
Inspection
CAUTION:
- Do not use compressed air or a high pressure pump.
- Do not exceed 4.12 kPa (0.042 kg/cm2, 0.6 psi) of pressure in EVAP system.
NOTE:
- Do not start engine.
- Improper installation of EVAP service port adapter [commercial service tool: (J-41413-OBD)] to the EVAP service port may cause a leak.
1.EVAP LEAK CHECK
With CONSULT
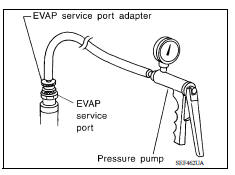
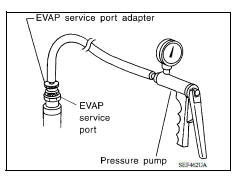
- Install EVAP service port adapter [commercial service tool: (J- 41413-OBD)] and pressure pump to EVAP service port.
- Turn ignition switch ON.
- Select the "EVAP SYSTEM CLOSE" in "WORK SUPPORT" mode of "ENGINE" using CONSULT.
- Touch "START". A bar graph (Pressure indicating display) will appear on the screen.
- Apply positive pressure to the EVAP system until the pressure indicator reaches the middle of the bar graph.
- Remove EVAP service port adapter [commercial service tool: (J- 41413-OBD)] and hose with pressure pump.
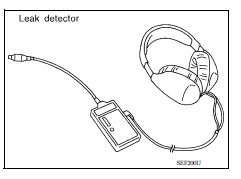
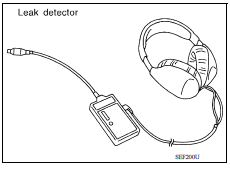
7. Locate the leak using a leak detector [commercial service tool: (J-41416)]. Refer to EC, "EVAPORATIVE EMISSION SYSTEM : System Description".
Without CONSULT
- Install EVAP service port adapter [commercial service tool: (J- 41413-OBD)] and pressure pump to EVAP service port.
- Apply battery voltage between the terminals of EVAP canister vent control valve to make a closed EVAP system.
- To locate the leak, deliver positive pressure to the EVAP system until pressure gauge points reach 1.38 to 2.76 kPa (0.014 to 0.028 kg/cm2, 0.2 to 0.4 psi).
- Remove EVAP service port adapter [commercial service tool: (J- 41413-OBD)] and hose with pressure pump.
5. Locate the leak using a leak detector [commercial service tool: (J-41416)]. Refer to EC, "EVAPORATIVE EMISSION SYSTEM : System Description".
>> INSPECTION END
 Evaporative emission system
Inspection 1.CHECK EVAP CANISTER Block port (B). Blow air into port (A) and check that it flows freely out of port (C). Release blocked port (B). Apply vacuum pressure to port (B) and check ...
Positive crankcase ventilation
Inspection 1.CHECK PCV VALVE With engine running at idle, remove PCV valve from rocker cover. A properly working valve makes a hissing noise as air passes through it. A strong vacuum should be f ...
Other materials:
Recommended fluids/lubricants and capacities
The following are approximate capacities. The actual refill capacities may
be a little different. When refilling, follow the procedure
described in the "Do-it-yourself" section to determine the proper refill
capacity.
...
Service data and specifications
(sds)
General Specification
GENERAL SPECIFICATIONS
Engine type
HR16DE
Cylinder arrangement
Inline 4
Displacement &nbs ...
Categories
- Manuals Home
- Nissan Versa Owners Manual
- Nissan Versa Service Manual
- Video Guides
- Questions & Answers
- External Resources
- Latest Updates
- Most Popular
- Sitemap
- Search the site
- Privacy Policy
- Contact Us

0.0052