Nissan Versa (N17): Radiator core support upper
RADIATOR CORE SUPPORT UPPER : Removal and Installation
RADIATOR CORE SUPPORT UPPER
Removal
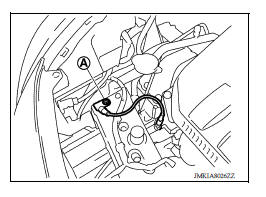
1. Remove ground harness bolt (A).
2. Remove horn. Refer to HRN "Removal and Installation".
3. Remove hood lock assembly and hood lock control cable assembly clip. Refer to DLK "HOOD LOCK : Removal and Installation".
4. Remove crash zone sensor. Refer to SR "Removal and Installation".
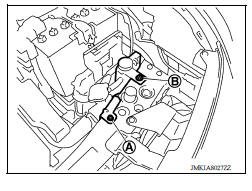
5. Remove radiator cap adapter bracket bolt (A) and radiator reservoir tank bolt (B).
6. Remove radiator upper seal clips.
7. Remove upper clips of radiator side seal (LH/RH).
8. Disconnect all harness clips.
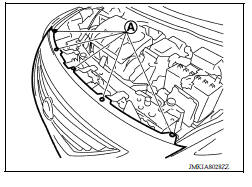
9. Remove front bumper fascia upper side clips (A).
10. Remove radiator core support upper bolts.
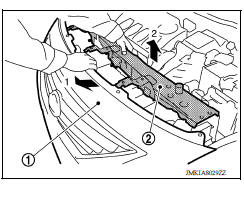
11. Pull back on upper part of front bumper fascia (1) and then remove radiator core support upper (2) by pulling upward.
Installation
Installation is in the reverse order of removal.
 Hood hinge
HOOD HINGE : Removal and Installation REMOVAL Remove hood assembly. Refer to DLK "HOOD ASSEMBLY : Removal and Installation". Remove hood support rod and grommet. Refer to DLK" ...
Radiator core support lower
RADIATOR CORE SUPPORT LOWER : Removal and Installation Removal 1. Remove under cover. Refer to EXT "Removal and Installation". 2. Remove radiator upper seal clips. 3. Remove front bumpe ...
Other materials:
Cold weather driving
Freeing a frozen door lock
To prevent a door lock from freezing, apply deicer
through the key hole. If the lock becomes
frozen, heat the key before inserting it into the key
hole, or use the remote keyless entry key fob or
the NISSAN Intelligent Key.
Antifreeze
In the winter when it is antic ...
4-speed automatic transmission fluid (ATF) (if so equipped)
When checking or replacement of automatic
transmission fluid is required, it is recommended
that you visit a NISSAN dealer for servicing.
WARNING
When the engine is running, keep
hands, jewelry and clothing away from
any moving parts such as the cooling
fan and drive belts
Automatic t ...
Categories
- Manuals Home
- Nissan Versa Owners Manual
- Nissan Versa Service Manual
- Video Guides
- Questions & Answers
- External Resources
- Latest Updates
- Most Popular
- Sitemap
- Search the site
- Privacy Policy
- Contact Us

0.005