Nissan Versa (N17): Radiator core support lower
RADIATOR CORE SUPPORT LOWER : Removal and Installation
Removal
1. Remove under cover. Refer to EXT "Removal and Installation".
2. Remove radiator upper seal clips.
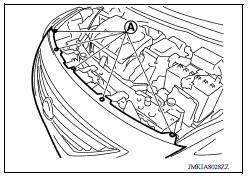
3. Remove front bumper fascia upper side clips (A).
4. Remove fender protector (LH/RH) clips from radiator core support lower. Refer to EXT "Exploded View".
5. Remove lower clips of radiator side seal (LH/RH).
6. Remove lower clips of condenser side seal.
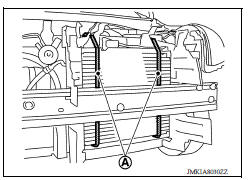
7. Use suitable tools (A) to suspend components and to prevent them from falling.
CAUTION: Use care to avoid damage to radiator and condenser.
8. Remove radiator core support lower bolts and radiator core support lower.
Installation
Installation is in the reverse order of removal.
FRONT FENDER
Exploded View
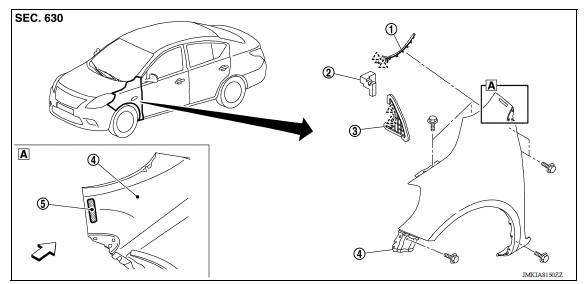
1. Front fender cover 2. Front fender seal 3. Front fender upper insulator
4. Front fender 5. Front fender stiffener  Front
Front
 Pawl
Pawl
 Radiator core support upper
RADIATOR CORE SUPPORT UPPER : Removal and Installation RADIATOR CORE SUPPORT UPPER Removal 1. Remove ground harness bolt (A). 2. Remove horn. Refer to HRN "Removal and Installation" ...
Front fender
FRONT FENDER : Removal and Installation CAUTION: Use a shop cloths to protect the body from being damaged during removal and installation. REMOVAL Remove fender protector. Refer to EXT " ...
Other materials:
Wiper and washer switch
Switch operation
Type A (if so equipped)
The windshield wiper and washer operates when
the ignition switch is in the ON position.
Push the lever down to operate the wiper at the
following speed:
Intermittent (INT) - intermittent operation
can be adjusted by turning the knob toward
...
Fuel efficient driving tips
Follow these easy-to-use Fuel Efficient Driving
Tips to help you achieve the most fuel economy
from your vehicle.
1. Use Smooth Accelerator and Brake
Pedal Application
Avoid rapid starts and stops.
Use smooth, gentle accelerator and
brake application whenever possible.
Maintain constan ...
Categories
- Manuals Home
- Nissan Versa Owners Manual
- Nissan Versa Service Manual
- Video Guides
- Questions & Answers
- External Resources
- Latest Updates
- Most Popular
- Sitemap
- Search the site
- Privacy Policy
- Contact Us

0.005