Nissan Versa (N17): A/T Shift selector
Exploded View
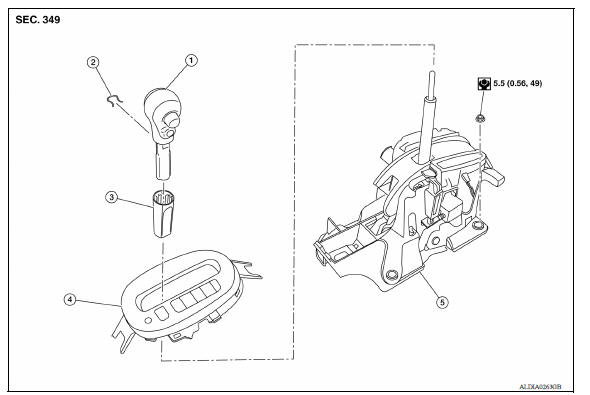
1. Shift selector handle 2. Lock pin 3. Shift selector handle cover 4. Position indication panel 5. Shift selector assembly
Removal and Installation
CAUTION: Always apply the parking brake before performing removal and installation.
REMOVAL
- Move the shift selector to the "N" position.
- Remove the shift selector handle. Refer to TM "Disassembly and Assembly".
- Remove the center console. Refer to IP "Removal and Installation".
- Disconnect the harness connector from the shift selector.
- Move the shift selector to the "P" position.
- Remove the key interlock cable from the shift selector assembly. Refer to TM "Removal and Installation".
- Remove the control cable from the shift selector assembly. Refer to TM "Removal and Installation".
- Remove the shift selector assembly.
INSTALLATION
Installation is in the reverse order of removal.
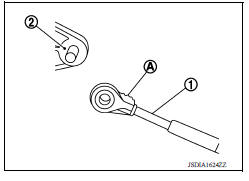
- When connecting the control cable (1) to the shift selector assembly (2), face the grooved surface of the rib (A) up and insert the control cable until it stops.
Disassembly and Assembly
DISASSEMBLY
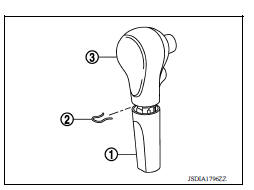
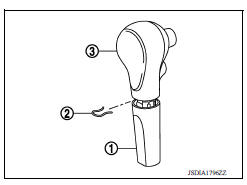
- Slide the shift selector handle cover (1) down.
CAUTION: Do not damage the shift selector handle cover.
- Pull out the lock pin (2).
- Pull the shift selector handle (3) and shift selector handle cover upward to remove them.
- Remove the position lamp.
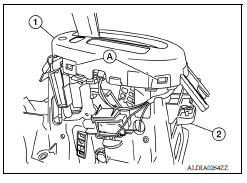
- Disengage the hooks (A) (4 locations), and lift up the position
indication panel (1) to separate it from the shift selector assembly
(2).
CAUTION: Do not damage the shift selector assembly.
ASSEMBLY
Assembly is in the reverse order of disassembly.
- Follow the procedure below to install the shift selector handle.
- Install the lock pin (2) onto the shift selector handle (3).
- Install the shift selector handle cover (1) onto the shift selector handle.
- Press the shift selector handle onto the shift selector until it
clicks.
CAUTION:- When pressing the shift selector handle onto the shift selector, do not press the shift selector handle button. - Do not strike the shift selector handle to install it into place.
- After installing shift selector handle, pull the handle to check that it does not become disconnected.
Inspection and Adjustment
INSPECTION
- Move the shift selector to "P" position, and turn ignition switch ON.
- Check that shift selector can be moved to other than "P" position when brake pedal is depressed. Also check that shift selector can be moved from "P" position only when brake pedal is depressed.
- Move the shift selector and check for excessive effort, sticking, noise or rattle.
- Check that shift selector stops at each position with the feel of engagement when it is moved through all the positions. Check that the actual position of shift selector matches the position shown by shift position indicator and manual lever on the transaxle.
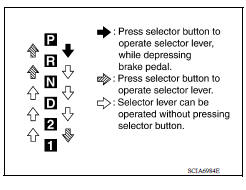
- The method of operating shift selector to individual positions correctly should be as shown.
- When shift selector handle button is pressed in "P", "R", "N", "D", "2" or "1" position without applying forward/backward force to shift selector, check button operation for sticking.
- Check that back-up lamps illuminate only when shift selector is placed in the "R" position.
- Check that back-up lamps do not illuminate when shift selector
is pushed toward the "R" position when in the "P" or "N" position.
CAUTION: Check the lighting without pressing shift selector handle button.
- Check that the engine can only be started with shift selector in the "P" and "N" positions.
- Check that transaxle is locked completely when shift selector is in "P" position.
ADJUSTMENT
- Move shift selector to " P" position.
CAUTION: Rotate the wheels at least a quarter turn and be certain the transaxle is locked in the "P" position.
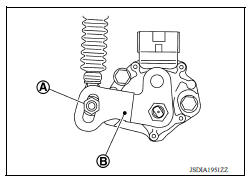
- Loosen the control cable nut (A).
- Place manual lever (B) to "P" position.
CAUTION: Do not apply force to the manual lever.
- Tighten the control cable nut. Refer to TM "Exploded View".
CAUTION: Do not move the manual lever when tightening.
 A/T Fluid
Inspection FLUID LEAKAGE Check transaxle surrounding area (oil seal and plug etc.)for fluid leakage. If anything is found, repair or replace damaged parts and adjust A/ T fluid level. Ref ...
Control cable
Exploded View 1. Bracket B 2. Lock plate 3. Transaxle assembly 4. Bracket A 5. Control cable 6. Shift selector assembly A: Manual lever B: Grommet Removal and Installation CAUTION: Always ap ...
Other materials:
Parking/parking on hills
WARNING
Do not stop or park the vehicle over
flammable materials such as dry grass,
waste paper or rags. They may ignite
and cause a fire.
Safe parking procedures require that
both the parking brake be set and the
transmission placed into P (Park) or in
an appropriate gear for ...
U0155 Lost communication (IPC)
Description
CAN (Controller Area Network) is a serial communication line for real-time
application. It is an on-vehicle multiplex
communication line with high data communication speed and excellent malfunction
detection ability.
Many electronic control units are equipped onto a vehicle, and ...
Categories
- Manuals Home
- Nissan Versa Owners Manual
- Nissan Versa Service Manual
- Video Guides
- Questions & Answers
- External Resources
- Latest Updates
- Most Popular
- Sitemap
- Search the site
- Privacy Policy
- Contact Us

0.0076