Nissan Versa (N17): Trunk lid hinge
TRUNK LID HINGE : Removal and Installation
REMOVAL
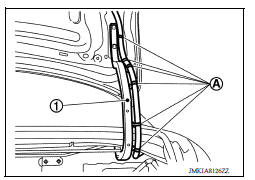
1. Remove harness clips (A) from trunk lid hinge (RH only) (1).
2. Remove trunk lid assembly. Refer to DLK "TRUNK LID ASSEMBLY : Removal and Installation".
3. Remove torsion bar. Refer to DLK "TORSION BAR : Removal and Installation".
4. Remove rear parcel shelf finisher. Refer to INT "Removal and Installation".
5. Remove trunk lid hinge bolts (body side) and then trunk lid hinge.
INSTALLATION
Installation is in the reverse order of removal.
CAUTION:
- After installation, check trunk lid open/close, lock/unlock operation.
- After installation, perform the trunk lid adjustment procedure. Refer to DLK "TRUNK LID ASSEMBLY : Adjustment".
- Apply touch-up paint (body color) onto the heads of trunk lid hinge bolts.
- Check trunk lid hinge rotating point for poor lubrication. If necessary, apply a suitable multi-purpose grease.
 Trunk lid striker
TRUNK LID STRIKER : Removal and Installation REMOVAL 1. Remove trunk rear plate. Refer to INT "TRUNK REAR PLATE : Removal and Installation". 2. Remove trunk lid opener cable bolt (A) ...
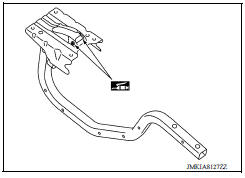
Torsion bar
TORSION BAR : Removal and Installation REMOVAL 1. Remove torsion bar clamp. 2. Support trunk lid with a suitable tool. WARNING: Bodily injury may occur if trunk lid is not supported properly wh ...
Other materials:
Control linkage
Exploded View
1. Shifter lever A 2. Selector lever 3. Selector cable
4. Shifter cable 5. Cable mounting bracket 6. Tapping bolt
7. Bracket 8. Grommet 9. M/T shift selector assembly
10. Shift selector 11. Shift selector handle
Removal and Installation
REMOVAL
Move the shift selector to ...
P0734 4GR Incorrect ratio
Description
This malfunction is detected when the A/T does not shift into 4GR position as
instructed by TCM. This is not
only caused by electrical malfunction (circuits open or shorted) but by
mechanical malfunction such as control
valve sticking, improper solenoid valve operation, etc.
DTC ...
Categories
- Manuals Home
- Nissan Versa Owners Manual
- Nissan Versa Service Manual
- Video Guides
- Questions & Answers
- External Resources
- Latest Updates
- Most Popular
- Sitemap
- Search the site
- Privacy Policy
- Contact Us

0.0059