
Nissan Versa (N17): Mainshaft and gear
Exploded View
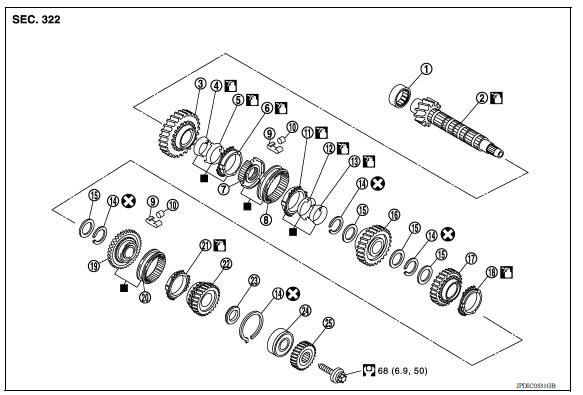
1. Mainshaft front bearing 2. Mainshaft 3. 1st main gear
4. 1st inner baulk ring 5. 1st synchronizer cone 6. 1st outer baulk ring
7. 1st-2nd synchronizer hub 8. 1st-2nd coupling sleeve 9. Spring
10. Insert key 11. 2nd outer baulk ring 12. 2nd synchronizer cone
13. 2nd inner baulk ring 14. Snap ring 15. Thrust washer
16. 2nd main gear 17. 3rd main gear 18. 3rd baulk ring
19. 3rd-4th synchronizer hub 20. 3rd-4th coupling sleeve 21. 4th baulk ring
22. 4th main gear 23. Spacer 24. Mainshaft rear bearing
25. 5th main gear
 : Apply gear oil.
 : Replace the parts as a set.
Disassembly
CAUTION:
- Secure mainshaft in a vise using blocks of wood to prevent damage, and then remove gears and snap rings.
- For removal of snap ring, set snap ring pliers and flat pliers at both sides of snap ring. While expanding snap ring with snap ring pliers, remove snap ring with flat pliers.
- Mark gear component direction for assembly without damaging component contact locations.
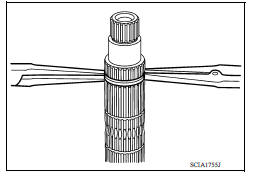
1. Remove 3rd-4th synchronizer hub and 3rd baulk ring.
2. Remove snap ring (1) and thrust washer (2).
CAUTION: Do not reuse snap ring.
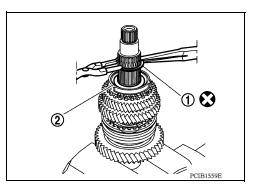
3. Remove 3rd main gear (1) and thrust washer (2).
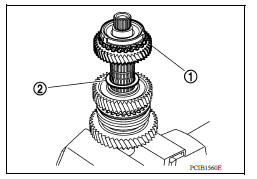
4. Remove snap ring (1) and thrust washer (2).
CAUTION: Do not reuse snap ring.
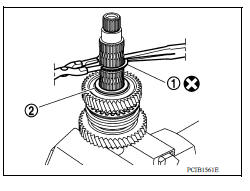
5. Remove 2nd main gear (1) and thrust washer (2).
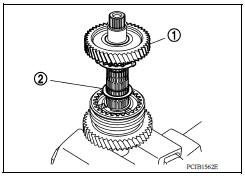
6. Remove snap ring (1), and then remove 2nd inner baulk ring, 2nd synchronizer cone, and 2nd outer baulk ring.
7. Remove 1st-2nd coupling sleeve, insert keys, springs, and 1st- 2nd synchronizer hub.
8. Remove 1st outer baulk ring, 1st synchronizer cone, 1st inner baulk ring, and 1st main gear (2).
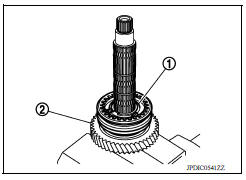
Assembly
Assembly is in the reverse order of disassembly.
CAUTION:
- Do not reuse snap ring.
- For installation of snap ring, set snap ring pliers and flat pliers at both sides of snap ring. While expanding snap ring with snap ring pliers, remove snap ring with flat pliers.
- Check that snap ring is securely installed to the groove.
- Apply gear oil to 1st outer baulk ring, 1st synchronizer cone, 1st inner baulk ring, 2nd outer baulk ring, 2nd synchronizer cone, 2nd inner baulk ring, and 3rd baulk ring.
- Replace 1st outer baulk ring, 1st synchronizer cone, and 1st inner baulk ring as a set.
- Replace 2nd outer baulk ring, 2nd synchronizer cone, and 2nd inner baulk ring as a set.
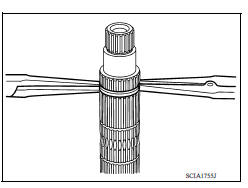
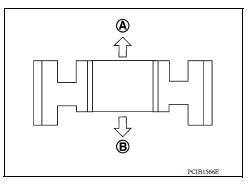
- Be careful with the orientation of 1st-2nd synchronizer hub.
(A) : 1st main gear side
(B) : 2nd main gear side
- Replace 1st-2nd synchronizer hub and 1st-2nd coupling sleeve as a set.
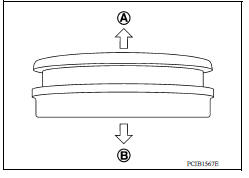
- Be careful with the orientation of 1st-2nd coupling sleeve.
(A) : 2nd main gear side
(B) : 1st main gear side
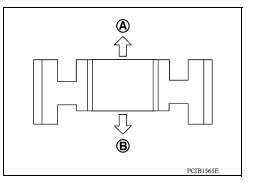
- Be careful with the orientation of 3rd-4th synchronizer hub.
(A) : 4th main gear side
(B) : 3rd main gear side
- Replace 3rd-4th synchronizer hub and 3rd-4th coupling sleeve as a set.
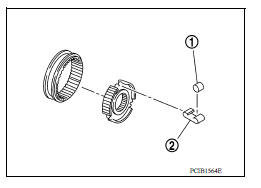
- Be careful with the orientation of insert key (1) and spring (2).
Inspection
INSPECTION AFTER DISASSEMBLY
Mainshaft and Gear
Check the following items and replace if necessary.
- Damage, peeling, uneven wear, and distortion of shaft.
- Excessive wear, damage, and peeling of gear.
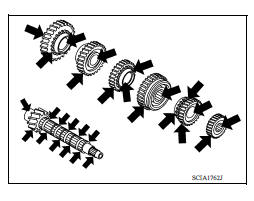
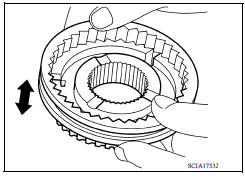
Synchronizer
Check the following items and replace if necessary.
- Contact surface breakage, damage, and unusual wear of coupling sleeve, synchronizer hub, insert key, and spring.
- Coupling sleeve and synchronizer hub move smoothly.
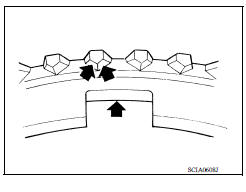
- Breakage, damage, and excessive wear of baulk ring cam surface and insert contact surface.
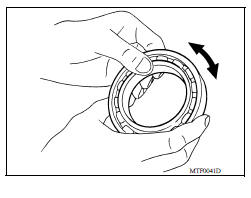
Bearing
Check bearing for damage and rough rotation. Replace if necessary
 Input shaft and gear
Exploded View 1. Input shaft front bearing 2. Input shaft 3. Snap ring 4. Input shaft rear bearing 5. Adapter plate 6. Bushing 7. 5th input gear 8. 5th-reverse baulk ring 9. Synchronizer lever ...
Final drive
Exploded View 1. Differential side bearing outer race 2. Differential side bearing 3. Final drive : Replace the parts as a set. Disassembly Remove differential side bearings, using Tool ...
Other materials:
Rear window defroster switch
To defrost the rear window glass, start the engine
and push the rear window defroster switch on.
The rear window defroster indicator light on the
switch comes on. Push the switch again to turn
the defroster off.
The rear window defroster automatically turns off
after approximately 15 m ...
Hood hinge
HOOD HINGE : Removal and Installation
REMOVAL
Remove hood assembly. Refer to DLK "HOOD ASSEMBLY : Removal and
Installation".
Remove hood support rod and grommet. Refer to DLK"HOOD SUPPORT ROD :
Removal and
Installation".
Remove front fender. Refer to DLK "FR ...
Categories
- Manuals Home
- Nissan Versa Owners Manual
- Nissan Versa Service Manual
- Video Guides
- Questions & Answers
- External Resources
- Latest Updates
- Most Popular
- Sitemap
- Search the site
- Privacy Policy
- Contact Us

0.015