
Nissan Versa (N17): Front pillar finisher
FRONT PILLAR FINISHER : Removal and Installation
REMOVAL
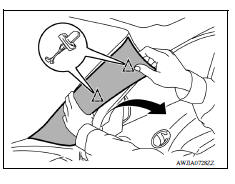
- Release front pillar portion of front body side welt.
- Pull front pillar finisher downward as shown, using mild pressure to disengage the front pillar finisher from the clips.
 : Clip
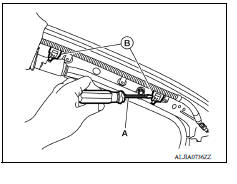
3. Remove the front pillar finisher clips (B) using a suitable tool (A).
INSTALLATION
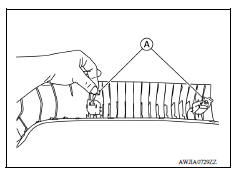
1. Install the front pillar finisher clips (A) to the front pillar finisher by inserting clip end and rotating 90 degrees in either direction.
2. Install the front pillar finisher to the front pillar.
CAUTION: When installing front pillar finisher, check that all clips are securely pressed into body panel holes.
 Rear door finisher
Exploded View 1. Rear door panel 2. Rear door finisher 3. Rear power window switch finisher (if equipped) 4. Grommet Clip Metal clip Pawl Removal and Installation REMOVAL Fully open r ...
Kicking plate inner
KICKING PLATE INNER : Removal and Installation FRONT KICKING PLATE Removal 1. Release front kicking plate pawls using a suitable tool (A) and remove front kicking ...
Other materials:
CSC (Concentric slave cylinder)
Exploded View
1. Transaxle assembly 2. CSC (concentric slave cylinder)
Removal and Installation
CAUTION:
Do not reuse CSC (concentric slave cylinder). CSC slides back to
the original position every time
when removing transaxle assembly. At this time, dust on the sliding parts
may ...
Line pressure control
LINE PRESSURE CONTROL : System Description
SYSTEM DIAGRAM
DESCRIPTION
Highly accurate line pressure control (secondary pressure control) reduces
friction for improvement of fuel
economy.
Normal Oil Pressure Control
Appropriate line pressure and secondary pressure suitable for driving
c ...
Categories
- Manuals Home
- Nissan Versa Owners Manual
- Nissan Versa Service Manual
- Video Guides
- Questions & Answers
- External Resources
- Latest Updates
- Most Popular
- Sitemap
- Search the site
- Privacy Policy
- Contact Us

0.0073