Nissan Versa (N17): Kicking plate inner
KICKING PLATE INNER : Removal and Installation
FRONT KICKING PLATE
Removal
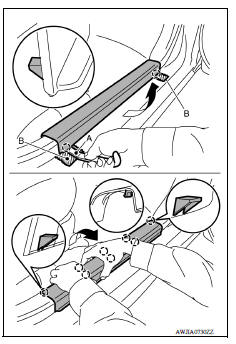
1. Release front kicking plate pawls using a suitable tool (A) and remove front kicking plate as shown.
CAUTION: Apply protective tape (B) to the body as shown before releasing the pawls on the outer ends.
 : Pawl
Installation
Installation is in the reverse order of removal.
CAUTION: When installing rear kicking plate, make sure that metal clips are securely pressed in body panel holes.
REAR KICKING PLATE
Removal
- Remove rear seat cushion. Refer to SE "Removal and Installation - Seat Cushion Assembly".
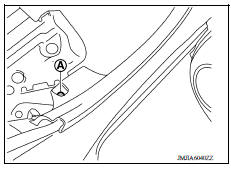
- Remove rear kicking plate clip (A).
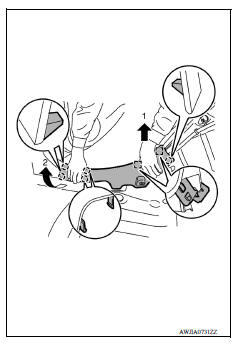
3. Lift rear end of rear kicking plate to disengage rear kicking plate metal clips, then rotate front end of rear kicking plate to disengage rear kicking plate pawls and remove rear kicking plate.
 : Metal clip
 : Pawl
Installation
Installation is in the reverse order of removal.
CAUTION: When installing rear kicking plate, make sure that metal clips are securely pressed in body panel holes.
 Front pillar finisher
FRONT PILLAR FINISHER : Removal and Installation REMOVAL Release front pillar portion of front body side welt. Pull front pillar finisher downward as shown, using mild pressure to disengage t ...
Dash side finisher
DASH SIDE FINISHER : Removal and Installation REMOVAL Remove front kicking plate. Refer to INT "KICKING PLATE INNER : Removal and Installation". Lift up rear end of dash side finis ...
Other materials:
B terminal circuit
Description
Terminal "B" is constantly supplied with battery power.
Diagnosis Procedure
Regarding Wiring Diagram information, refer to STR, "Wiring Diagram - With
Intelligent Key System" or
STR, "Wiring Diagram - Without Intelligent Key System".
CAUTION: Perform diagnosis ...
P0863 TCM Communication
Description
CAN (Controller Area Network) is a serial communication line for real time
application. It is an on-vehicle multiplex
communication line with high data communication speed and excellent malfunction
detection ability.
Many electronic control units are equipped onto a vehicle, and ...
Categories
- Manuals Home
- Nissan Versa Owners Manual
- Nissan Versa Service Manual
- Video Guides
- Questions & Answers
- External Resources
- Latest Updates
- Most Popular
- Sitemap
- Search the site
- Privacy Policy
- Contact Us

0.005