Nissan Versa (N17): Glove box assembly and housing
Removal and Installation
REMOVAL
1. Remove glove box lid.
a. Open glove box lid.
b. Pull glove box lid rearward and glove box lid hinges down and rearward to disengage, then remove the glove box lid.
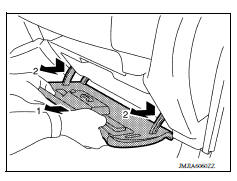
c. Disconnect glove box damper (if equipped).
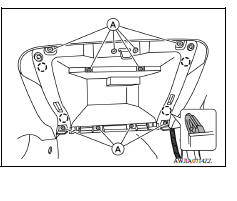
2. Remove glove box assembly.
a. Remove glove box assembly screws (A).
b. Pull glove box assembly rearward to disengage pawls and remove glove box assembly.
 : Pawl
INSTALLATION
Installation is in the reverse order of removal.
 Instrument lower panel LH
Removal and Installation REMOVAL Remove data link connector from instrument lower panel LH. Remove hood and fuel filler handle assembly bolts (A) and position hood and fuel filler handle as ...
Center console assembly
Exploded View 1. M/T console boot (M/T models) 2. Center console assembly Removal and Installation REMOVAL Move shift selector to "N" position (CVT models or A/T models). Remove shift ...
Other materials:
Valve oil seal
VALVE OIL SEAL : Removal and Installation
REMOVAL
Remove camshafts.
Remove valve lifters.
Rotate crankshaft, and set piston with valve oil seal to be removed to
TDC. This will prevent the valve
from dropping into cylinder.
CAUTION:
When rotating crankshaft, be careful to avoid ...
P2760 Torque converter
Description
This DTC is detected when the torque converter clutch solenoid valve is
electrically normal but the torque converter
clutch does not engage. This is not due to an electrical malfunction (circuit
open or shorted), but is
instead due to a mechanical malfunction (sticking of the con ...
Categories
- Manuals Home
- Nissan Versa Owners Manual
- Nissan Versa Service Manual
- Video Guides
- Questions & Answers
- External Resources
- Latest Updates
- Most Popular
- Sitemap
- Search the site
- Privacy Policy
- Contact Us

0.0054