
Nissan Versa (N17): Instrument lower panel LH
Removal and Installation
REMOVAL
- Remove data link connector from instrument lower panel LH.
- Remove hood and fuel filler handle assembly bolts (A) and position hood and fuel filler handle assembly aside.
- Remove instrument lower panel LH. Refer to IP "Exploded View".
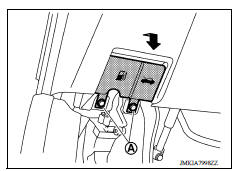
a. Release instrument lower panel LH by using a suitable tool to release the pawls and metal clips and pulling rearward.
CAUTION: Disengage pawls and metal clips slowly so that they are not damaged.
b. Disconnect harness connectors from instrument lower panel LH and remove.
INSTALLATION
Installation is in the reverse order of removal.
CLUSTER LID C
Removal and Installation
REMOVAL
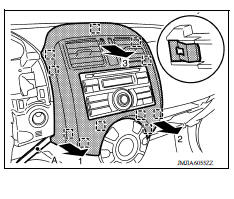
- Release the metal clips using a suitable tool (A), beginning in the lower left corner of cluster lid C and working in a counterclockwise direction.
- Reposition cluster lid C to access harness connectors.
- Disconnect harness connectors from cluster lid C and remove.
 : Metal clip
INSTALLATION
Installation is in the reverse order of removal.
 Cluster lid A
Removal and Installation REMOVAL Remove steering column covers. Refer to IP "Removal and Installation". Remove cluster lid C. Refer to IP "Removal and Installation". Remov ...
Glove box assembly and housing
Removal and Installation REMOVAL 1. Remove glove box lid. a. Open glove box lid. b. Pull glove box lid rearward and glove box lid hinges down and rearward to dise ...
Other materials:
When traveling or registering in another country
When planning to drive your NISSAN vehicle
in another country, you should first find
out if the fuel available is suitable for your vehicle's
engine.
Using fuel with an octane rating that is too low
may cause engine damage. All gasoline vehicles
must be operated with unleaded gasoline. There ...
Camshaft
Exploded View
1. Camshaft bracket (No. 2 to 5) 2. Camshaft bracket (No. 1) 3. Camshaft
sprocket (EXH)
4. Exhaust valve timing control solenoid
valve 5. Oring 6. Camshaft sprocket (INT)
7. Plug (EXH) 8. Washer (EXH) 9. Oil filter (for exhaust valve timing control
solenoid valve)
10. Cylinde ...
Categories
- Manuals Home
- Nissan Versa Owners Manual
- Nissan Versa Service Manual
- Video Guides
- Questions & Answers
- External Resources
- Latest Updates
- Most Popular
- Sitemap
- Search the site
- Privacy Policy
- Contact Us

0.0115