Nissan Versa (N17): Bluetooth antenna
Removal and Installation
REMOVAL
1. Remove the rear seat cushion assembly. Refer to SE "Removal and Installation - Seat Cushion Assembly".
2. Remove the rear step plate (RH).
3. Remove the rear seatback side assembly (RH).
4. Remove the rear seatback assembly (RH).
5. Remove the trunk floor finisher.
6. Remove the trunk rear finisher.
7. Remove the trunk side finisher (RH).
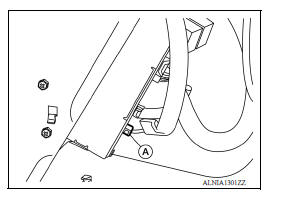
8. Disconnect the Bluetooth antenna from the bluetooth control unit (A).
9. Release the four Bluetooth antenna harness clips (B).
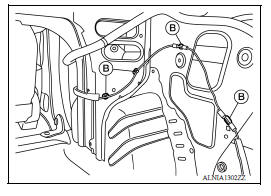
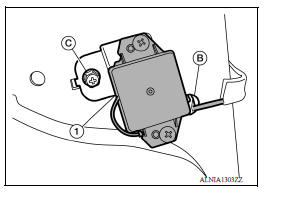
10. Release the remaining Bluetooth antenna harness clip (B) and remove the Bluetooth antenna screw (C).
11. Remove the Bluetooth antenna assembly (1).
INSTALLATION
Installation is in the reverse order of removal.
 Steering audio control switch
Removal and Installation 1. Steering wheel 2. Steering wheel audio control switches 3. Driver air bag module 4. Steering wheel rear finisher REMOVAL 1. Remove the steering wheel. Refer to ...
Bluetooth control unit
Removal and Installation REMOVAL 1. Remove the trunk floor finisher. 2. Remove the trunk rear finisher. 3. Remove the trunk side finisher (RH) 4. Disconnect the harness connector (A) from Bluet ...
Other materials:
P0977 Shift solenoid B
DTC Logic
DTC DETECTION LOGIC
DTC
Trouble diagnosis name
DTC detection condition
Possible causes
P0977
Shift Solenoid B Control Circuit
High
The following diagnosis conditions
are met, and the TCM low
clutch solenoid valve current
monitor reading is 200 ...
Stall test
Work Procedure
INSPECTION
Check the engine oil level. Replenish if necessary.
Check for leak of the CVT fluid. Refer to TM "Inspection".
Drive for about 10 minutes to warm up the vehicle so that the CVT fluid
temperature is 50 to 80C (122 to
176F).
Be sure to apply the par ...
Categories
- Manuals Home
- Nissan Versa Owners Manual
- Nissan Versa Service Manual
- Video Guides
- Questions & Answers
- External Resources
- Latest Updates
- Most Popular
- Sitemap
- Search the site
- Privacy Policy
- Contact Us

0.0052