Nissan Versa (N17): Bluetooth antenna
Removal and Installation
REMOVAL
1. Remove the rear seat cushion assembly. Refer to SE "Removal and Installation - Seat Cushion Assembly".
2. Remove the rear step plate (RH).
3. Remove the rear seatback side assembly (RH).
4. Remove the rear seatback assembly (RH).
5. Remove the trunk floor finisher.
6. Remove the trunk rear finisher.
7. Remove the trunk side finisher (RH).
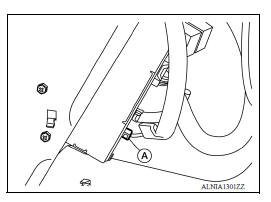
8. Disconnect the Bluetooth antenna from the bluetooth control unit (A).
9. Release the four Bluetooth antenna harness clips (B).
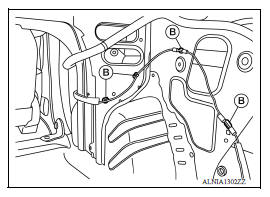
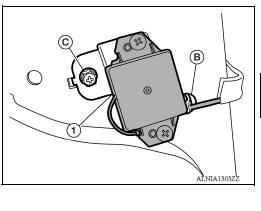
10. Release the remaining Bluetooth antenna harness clip (B) and remove the Bluetooth antenna screw (C).
11. Remove the Bluetooth antenna assembly (1).
INSTALLATION
Installation is in the reverse order of removal.
 Steering audio control switch
Removal and Installation 1. Steering wheel 2. Steering wheel audio control switches 3. Driver air bag module 4. Steering wheel rear finisher REMOVAL 1. Remove the steering wheel. Refer to ...
Microphone
Removal and Installation REMOVAL 1. Remove the microphone (1) from the headlining using a suitable tool. Clip 2. Disconnect the harness connector from microphone and remove. INSTALLATION I ...
Other materials:
RearView Monitor (if so equipped)
1. CAMERA button (models with navigation)
WARNING
Failure to follow the warnings and instructions
for proper use of the Rear-
View Monitor system could result in serious
injury or death.
RearView Monitor is a convenience feature
and is not a substitute for proper
backing. Always ...
Drive belt
1. Water pump pulley
2. Generator pulley
3. Manual tensioner pulley
4. Air conditioner compressor pulley
5. Crankshaft pulley
WARNING
Be sure the ignition switch is placed in the
OFF or LOCK position before servicing
drive belt. The engine could rotate
unexpectedly.
1. Visually inspect t ...
Categories
- Manuals Home
- Nissan Versa Owners Manual
- Nissan Versa Service Manual
- Video Guides
- Questions & Answers
- External Resources
- Latest Updates
- Most Popular
- Sitemap
- Search the site
- Privacy Policy
- Contact Us

0.0047