Nissan Versa (N17): Trunk room lamp
Exploded View
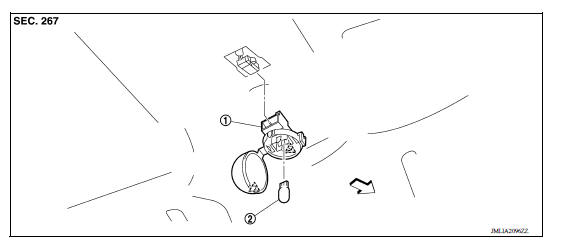
1. Trunk room lamp 2. Bulb Front
 Pawl
Pawl
Removal and Installation
WARNING: Do not touch bulb with your hand while it is on or right after being turned off. Burning may result.
CAUTION:
- Do not touch the glass surface of the bulb with bare hands or allow oil or grease to get on it to prevent damage to the bulb.
- Leaving the bulb removed from housing for a long period of time can deteriorate performance of the lens and reflector (causing dirt or clouding). Always prepare a new bulb and have it on hand when replacing the bulb.
REMOVAL
1. Release the trunk room lamp pawl to open lens.
 : Pawl
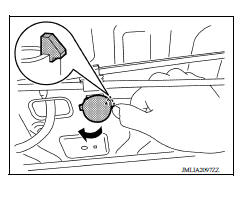
2. Remove the bulb.
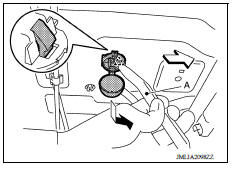
3. Release trunk room lamp pawl with a suitable tool (A)
 Pawl
Pawl
 Front
Front
4. Disconnect harness connector from trunk room lamp and remove.
INSTALLATION
Installation is in the reverse order of removal.
Bulb Replacement
WARNING: Do not touch bulb with your hand while it is on or right after being turned off. Burning may result.
CAUTION:
- Do not touch the glass surface of the bulb with bare hands or allow oil or grease to get on it to prevent damage to the bulb.
- Leaving the bulb removed from housing for a long period of time can deteriorate performance of the lens and reflector (causing dirt or clouding). Always prepare a new bulb and have it on hand when replacing the bulb.
TRUNK ROOM LAMP BULB
Removal
1. Release the trunk room lamp pawl to open lens.
 Pawl
Pawl
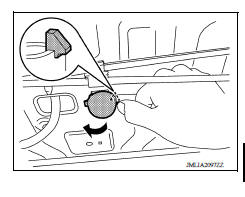
2. Remove the bulb.
Installation
Installation is in the reverse order of removal.
ILLUMINATION CONTROL SWITCH
Removal and Installation
The illumination control switch is integrated in the combination meter. Refer to MWI "Removal and Installation" (TYPE A) or MWI "Removal and Installation" (TYPE B).
SERVICE DATA AND SPECIFICATIONS (SDS)
Bulb Specifications
*: Always check with the Parts Department for the latest parts info.
 Console lamp
Precautions
Precaution for Supplemental Restraint System (SRS) "AIR BAG" and "SEAT BELT PRE-TENSIONER" The Supplemental Restraint System such as "AIR BAG" and "SEAT BELT PRE-TENSIONER", us ...
Other materials:
Consult function
APPLICATION ITEMS
Diagnostic test mode
Function
Work Support
This mode enables a technician to adjust some devices faster and
more accurately.
Self Diagnostic Results
Retrieve DTC from ECU and display diagnostic items.
Data Monitor
Monitor the input ...
Steering column covers
Removal and Installation
REMOVAL
Remove instrument lower panel LH. Refer to IP "Removal and
Installation".
Remove lower knee protector (LH) bolts and lower knee protector (LH).
Refer to IP "Exploded View".
Remove steering column covers.
a. Remove steering colu ...
Categories
- Manuals Home
- Nissan Versa Owners Manual
- Nissan Versa Service Manual
- Video Guides
- Questions & Answers
- External Resources
- Latest Updates
- Most Popular
- Sitemap
- Search the site
- Privacy Policy
- Contact Us

0.0078