Nissan Versa (N17): Door switch
Exploded View
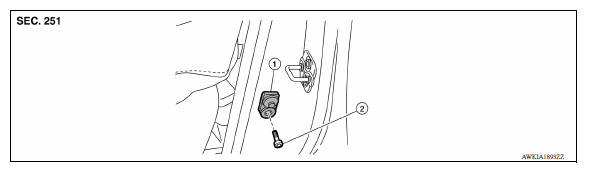
1. Door switch 2. Door switch bolt
Removal and Installation
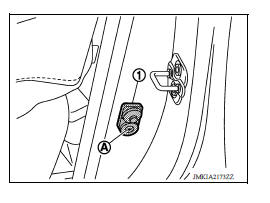
REMOVAL
1. Remove the door switch bolt (A).
2. Disconnect the harness connector and remove door switch (1).
INSTALLATION
Installation is in the reverse order of removal.
TRUNK LID OPENER SWITCH
Removal and Installation
REMOVAL
1. Remove the trunk lid finisher. Refer to EXT "Removal and Installation".
2. Disconnect harness connector from the trunk lid opener switch.
3. Remove the trunk lid opener switch.
INSTALLATION
Installation is in the reverse order of removal.
 Fuel filler lid lock
FUEL FILLER LID LOCK : Removal and Installation REMOVAL 1. Fully open fuel filler lid. 2. Remove trunk side finisher (LH). Refer to INT "TRUNK SIDE FINISHER : Removal and Installation". ...

Other materials:
Exhaust system
Exploded View
1. Heated oxygen sensor 2 2. Catalyst cover (upper) 3. Seal bearing
4. Catalyst cover (lower) 5. Spring 6. Spring
7. Mounting rubber 8. Main muffler 9. Ring gasket
10. Center muffler 11. Mounting rubber 12. Seal bearing
13. Exhaust front tube
Removal and Installation
WARNIN ...
Unexpected pedal reaction
Diagnosis Procedure
1.CHECK BRAKE PEDAL STROKE
Check brake pedal stroke. Refer to BR "Inspection and Adjustment".
Is the stroke too big?
YES >>
Bleed air from brake line and hose. Refer to BR "Bleeding Brake System".
Check brake pedal, brake booster, and master cy ...
Categories
- Manuals Home
- Nissan Versa Owners Manual
- Nissan Versa Service Manual
- Video Guides
- Questions & Answers
- External Resources
- Latest Updates
- Most Popular
- Sitemap
- Search the site
- Privacy Policy
- Contact Us

0.0271