Nissan Versa (N17): Front door speaker
Removal and Installation
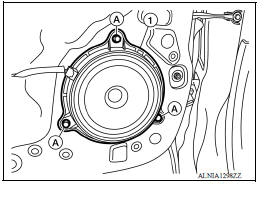
REMOVAL
1. Remove the front door finisher. Refer to INT "Removal and Installation".
2. Remove the front door speaker screws (A).
3. Disconnect the harness connector from front door speaker (1) and remove.
INSTALLATION
Installation is in the reverse order of removal.
 USB Connector
Removal and Installation REMOVAL 1. Remove the center console assembly. Refer to IP "Removal and Installation". 2. Release the pawl from the back of the center console to remove the ...
Rear door speaker
Removal and Installation REMOVAL 1. Remove the rear door finisher. Refer to INT "Removal and Installation". 2. Remove the rear door speaker screws (A). 3. Disconnect the harness connec ...
Other materials:
Wheel alignment
Inspection
DESCRIPTION
CAUTION:
The adjustment mechanisms of camber and toe-in are not included.
If camber and toe-in is outside the standard, check front
suspension parts for wear and damage.
Replace suspect parts if a malfunction is detected.
Measure wheel alignment under unladen ...
Road wheel tire assembly
Adjustment
BALANCING WHEELS (ADHESIVE WEIGHT TYPE)
Preparation Before Adjustment
Remove inner and outer balance weights from the road wheel. Using releasing
agent, remove double-faced
adhesive tape from the road wheel.
CAUTION:
Be careful not scratch the road wheel during removal.
Afte ...
Categories
- Manuals Home
- Nissan Versa Owners Manual
- Nissan Versa Service Manual
- Video Guides
- Questions & Answers
- External Resources
- Latest Updates
- Most Popular
- Sitemap
- Search the site
- Privacy Policy
- Contact Us

0.0067