Nissan Versa (N17): Rear door speaker
Removal and Installation
REMOVAL
1. Remove the rear door finisher. Refer to INT "Removal and Installation".
2. Remove the rear door speaker screws (A).
3. Disconnect the harness connector from rear door speaker (1) and remove.
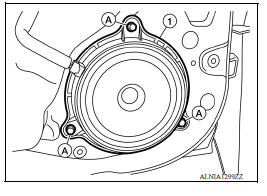
INSTALLATION
Installation is in the reverse order of removal.
 Front door speaker
Removal and Installation REMOVAL 1. Remove the front door finisher. Refer to INT "Removal and Installation". 2. Remove the front door speaker screws (A). 3. Disconnect the harness connec ...
Satellite radio antenna
Removal and Installation REMOVAL 1. Remove the headlining assembly. Refer to INT "Removal and Installation". 2. Disconnect the satellite radio antenna retainers (A) using a suitable to ...
Other materials:
Security systems (if so equipped)
Your vehicle has one type of security systems:
NISSAN Vehicle Immobilizer System
NISSAN vehicle immobilizer system
The NISSAN Vehicle Immobilizer System will not
allow the engine to start without the use of a
registered key.
If the engine fails to start using a registered key
(for ex ...
P0976 Shift solenoid B
DTC Logic
DTC DETECTION LOGIC
DTC
Trouble diagnosis name
DTC detection condition
Possible causes
P0976
Shift Solenoid B Control Circuit
Low
The following diagnosis conditions
are met, and the TCM low
clutch solenoid valve current
monitor reading is 200 m ...
Categories
- Manuals Home
- Nissan Versa Owners Manual
- Nissan Versa Service Manual
- Video Guides
- Questions & Answers
- External Resources
- Latest Updates
- Most Popular
- Sitemap
- Search the site
- Privacy Policy
- Contact Us

0.0066