Nissan Versa (N17): Fuel filler opener cable
FUEL FILLER OPENER CABLE : Removal and Installation
REMOVAL
1. Remove hood and fuel filler handle assembly bolts (A).
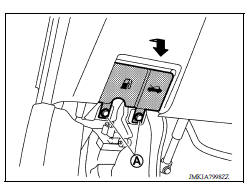
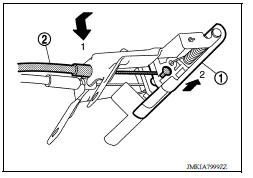
2. Disconnect fuel filler lid opener cable (2) by pulling downward and then sliding cable end to the side to remove from hood and fuel filler handle assembly (1).
3. Remove dash side finisher (LH). Refer to INT "DASH SIDE FINISHER : Removal and Installation".
4. Remove center pillar lower finisher (LH). Refer to INT "CENTER PILLAR LOWER FINISHER : Removal and Installation".
5. Remove trunk side finisher (LH). Refer to INT"TRUNK SIDE FINISHER : Removal and Installation".
6. Remove fuel filler lid opener cable from fuel filler lid lock assembly. Refer to DLK "FUEL FILLER LID LOCK : Removal and Installation".
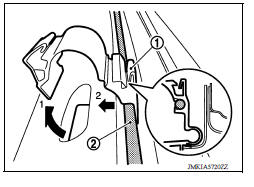
7. Disengage each harness protector (1), and then remove fuel filler lid opener cable (2).
INSTALLATION
Installation is in the reverse order of removal.
CAUTION: After installation, check fuel filler lid assembly open/close, lock/unlock operation.
NOTE:
- The following table shows the specifications for a correctly installed fuel filler lid.
- Fitting adjustment cannot be performed.

 Fuel filler lid
FUEL FILLER LID : Removal and Installation REMOVAL 1. Fully open fuel filler lid. 2. Remove fuel cap pin (1). 3. Remove fuel filler lid screws and fuel filler lid. INSTALLATION Installation is ...
Fuel filler lid lock
FUEL FILLER LID LOCK : Removal and Installation REMOVAL 1. Fully open fuel filler lid. 2. Remove trunk side finisher (LH). Refer to INT "TRUNK SIDE FINISHER : Removal and Installation". ...
Other materials:
Camshaft
Exploded View
1. Camshaft bracket (No. 2 to 5) 2. Camshaft bracket (No. 1) 3. Camshaft
sprocket (EXH)
4. Exhaust valve timing control solenoid
valve 5. Oring 6. Camshaft sprocket (INT)
7. Plug (EXH) 8. Washer (EXH) 9. Oil filter (for exhaust valve timing control
solenoid valve)
10. Cylinde ...
Engine oil
Inspection
ENGINE OIL LEVEL
Park vehicle on a level surface, wait 10 minutes before checking the
engine oil level.
Pull out oil level gauge and wipe it clean.
Insert oil level gauge and make sure the engine oil level is within
the range (A) as shown.
If it is out of range, adjust it. ...
Categories
- Manuals Home
- Nissan Versa Owners Manual
- Nissan Versa Service Manual
- Video Guides
- Questions & Answers
- External Resources
- Latest Updates
- Most Popular
- Sitemap
- Search the site
- Privacy Policy
- Contact Us

0.005