Nissan Versa (N17): Inside handle
INSIDE HANDLE : Removal and Installation
REMOVAL
1. Remove rear door finisher. Refer to INT "Removal and Installation".
2. Remove upper side of sealing screen.
NOTE: Cut the butyl tape so that some parts of the butyl tape remain on the sealing screen, if the sealing screen is reused.
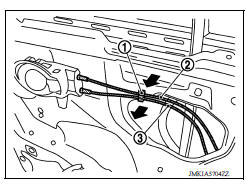
3. Disengage lock knob cable (2) and inside handle cable (3) from cable clip (1).
4. Remove inside handle bolt.
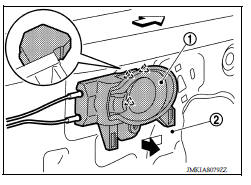
5. Disengage inside handle (1) from door panel (2) by sliding toward vehicle rear and then separating.
 : Pawl
 : Front
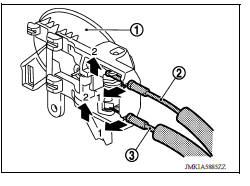
6. Disengage inside handle cable (3) and lock knob cable (2), and then remove inside handle (1).
INSTALLATION
Installation is in the reverse order of removal.
CAUTION: After installation, check door open/close, lock/unlock operation.
 Door lock
DOOR LOCK : Removal and Installation REMOVAL 1. Remove inside handle. Refer to DLK "INSIDE HANDLE : Removal and Installation". 2. Remove outside handle. Refer to DLK "OUTSIDE HANDL ...
Outside handle
OUTSIDE HANDLE : Removal and Installation REMOVAL 1. Fully close rear door glass. 2. Remove rear door finisher. Refer to INT "Removal and Installation". 3. Remove sealing screen. NOTE ...
Other materials:
Drive belt idler pulley
Exploded View
1. Generator bracket 2. Center shaft 3. Spacer
4. Adjusting bolt 5. Washer 6. Idler pulley
7. Plate
Removal and Installation
REMOVAL
Remove the fender protector (RH).
Remove the air duct inlet assembly.
Remove drive belt.
Remove the lock nut, and then remove the pl ...
Water pump
Exploded View
1. Gasket 2. Water pump 3. Water pump pulley
Removal and Installation
REMOVAL
CAUTION:
Do not remove the radiator cap when the engine is hot. Serious burns
could occur from highpressure
engine coolant escaping from the radiator. Wrap a thick cloth around the
radiator cap. ...
Categories
- Manuals Home
- Nissan Versa Owners Manual
- Nissan Versa Service Manual
- Video Guides
- Questions & Answers
- External Resources
- Latest Updates
- Most Popular
- Sitemap
- Search the site
- Privacy Policy
- Contact Us

0.0051