
Nissan Versa (N17): Instrument lower panel LH
Removal and Installation
REMOVAL
- Remove data link connector from instrument lower panel LH.
- Remove hood and fuel filler handle assembly bolts (A) and position hood and fuel filler handle assembly aside.
- Remove instrument lower panel LH. Refer to IP "Exploded View".
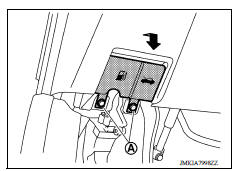
a. Release instrument lower panel LH by using a suitable tool to release the pawls and metal clips and pulling rearward.
CAUTION: Disengage pawls and metal clips slowly so that they are not damaged.
b. Disconnect harness connectors from instrument lower panel LH and remove.
INSTALLATION
Installation is in the reverse order of removal.
CLUSTER LID C
Removal and Installation
REMOVAL
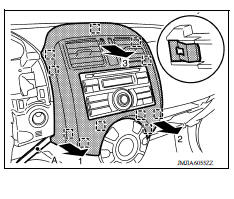
- Release the metal clips using a suitable tool (A), beginning in the lower left corner of cluster lid C and working in a counterclockwise direction.
- Reposition cluster lid C to access harness connectors.
- Disconnect harness connectors from cluster lid C and remove.
 : Metal clip
INSTALLATION
Installation is in the reverse order of removal.
 Cluster lid A
Removal and Installation REMOVAL Remove steering column covers. Refer to IP "Removal and Installation". Remove cluster lid C. Refer to IP "Removal and Installation". Remov ...
Glove box assembly and housing
Removal and Installation REMOVAL 1. Remove glove box lid. a. Open glove box lid. b. Pull glove box lid rearward and glove box lid hinges down and rearward to dise ...
Other materials:
Air cleaner
WARNING
Operating the engine with the air
cleaner filter off can cause you or others
to be burned. The air cleaner filter not
only cleans the intake air, it also stops
the flame if the engine backfires. If the
air cleaner is not installed and the engine
backfires, you could be burn ...
Electric ignition system
ELECTRIC IGNITION SYSTEM : System Diagram
ELECTRIC IGNITION SYSTEM : System Description
INPUT/OUTPUT SIGNAL CHART
Sensor
Input signal to ECM
ECM function
Actuator
Crankshaft position sensor (POS)
Engine speed*3
Piston position
Ignition timing control
Igni ...
Categories
- Manuals Home
- Nissan Versa Owners Manual
- Nissan Versa Service Manual
- Video Guides
- Questions & Answers
- External Resources
- Latest Updates
- Most Popular
- Sitemap
- Search the site
- Privacy Policy
- Contact Us

0.0081