Nissan Versa (N17): Front wheel hub and knuckle
Exploded View
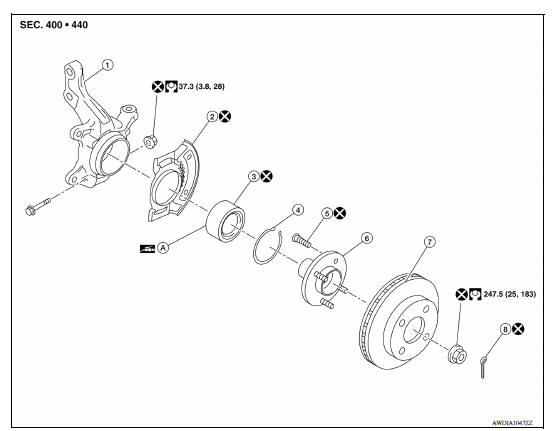
1. Steering knuckle 2. Splash guard 3. Wheel bearing 4. Snap ring 5. Wheel stud 6. Wheel hub 7. Disc rotor 8. Cotter pin A. Apply Molykote M77
Removal and Installation
REMOVAL
- Remove the wheel and tire assembly using power tool. Refer to WT "Adjustment".
- Remove wheel sensor and sensor harness. Refer to BRC "FRONT WHEEL SENSOR : Removal and Installation".
- Remove brake caliper using power tool, leaving brake caliper hydraulic lines connected. Reposition brake caliper aside with wire. Refer to BR "BRAKE CALIPER ASSEMBLY : Exploded View". NOTE: Avoid depressing brake pedal while brake caliper is removed.
- Put match
CAUTION:
- Use paint for matching parts. Do not damage the disc rotor or wheel hub assembly.
- Do not drop disc rotor.
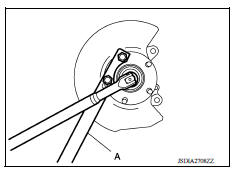
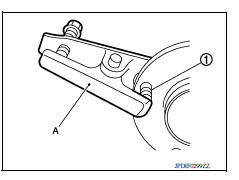
5. Remove and discard cotter pin, and then loosen wheel hub lock nut, using Tool (A).
Tool number : KV40104000 ( - )
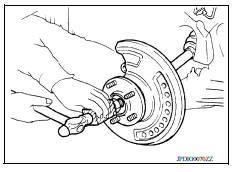
- Separate the drive shaft from the wheel hub and bearing assembly by lightly tapping the end of the drive shaft using a suitable tool and a wood block. NOTE: Use suitable puller, if wheel hub and drive shaft cannot be separated after performing the above procedure.
- Remove wheel hub lock nut.
- Remove the nut and separate the steering outer socket from steering knuckle. Refer to ST "Removal and Installation".
- Remove the nuts and bolts, then separate the steering knuckle from strut assembly. Refer to FSU "Removal and Installation".
- Suspend the drive shaft with suitable wire.
CAUTION:
- Do not place drive shaft joint at an extreme angle. Also be careful not to overextend slide joint.
- Do not allow drive shaft to hang down without support for joint sub-assembly, shaft and the other parts.
- Remove steering knuckle from transverse link.
- Remove wheel studs (1) from wheel hub, using the suitable tool (A).
CAUTION:
- Remove stud only when necessary.
- Do not hammer the wheel stud or damage to the wheel bearing may occur.
- Pull the wheel stud straight out to avoid damaging the stud.
INSTALLATION
Installation is in the reverse order of the removal.
CAUTION:
- During installation, do not damage the wheel bearing seal. If damage has occurred, replace wheel bearing with a new one.
- Do not allow paint to adhere to the wheel bearing seal.
- Check each mating surface for water and foreign matter. If there is any water or foreign matter, clean the mounting surface.
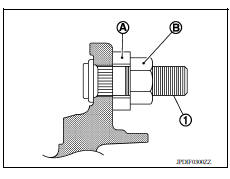
- Position the stud (1) to the wheel hub flange. Place a washer (A) and nut (B) on the opposite end of the stud, tighten to press the stud into the wheel hub flange.
CAUTION:
- Check that no clearance exists between wheel hub, and wheel stud after installation.
- Do not reuse wheel stud.
- Do not reuse steering knuckle and transverse link nut.
- Clean the mating surface of wheel hub lock nut and wheel hub. CAUTION: Do not apply lubricating oil to the mating surface of the wheel hub lock nut and the wheel hub.
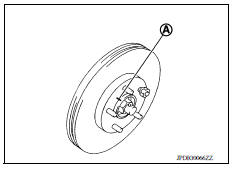
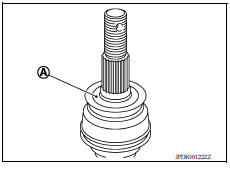
- Clean the mating surface of drive shaft, wheel hub, and wheel
bearing. And then apply Molykote M77 to surface (A) of joint subassembly
of drive shaft.
CAUTION: Apply Molykote M77 to cover entire flat surface of joint subassembly of drive shaft.
Molykote M77 quantity : 1.0 - 3.0 g (0.04 - 0.10 oz)
- When reusing disc rotor, align the matching marks during removal.
- Perform the final tightening of each part under unladen conditions, which were removed when removing wheel hub and axle housing.
- When installing a cotter pin, securely bend the basal portion to prevent
rattles.
CAUTION: Do not reuse cotter pin.
Disassembly and Assembly
DISASSEMBLY
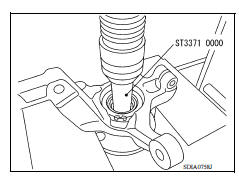
- Remove wheel hub, using Tool.
- Remove splash guard from steering knuckle
Tool number : ST33710000 ( - )
- Remove wheel bearing inner race (outer side) from wheel hub, using Tools.
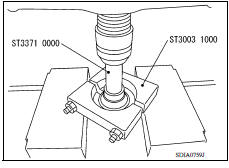
- Remove snap ring from steering knuckle, using suitable tool.
CAUTION: Do not damage steering knuckle.
Tool number : ST33710000 ( - )
Tool number : ST30031000 ( - )
5. Remove wheel bearing using Tool from steering knuckle.
Tool number : ST35321000 ( - )
ASSEMBLY
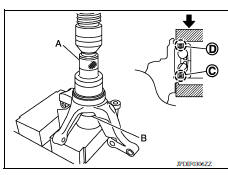
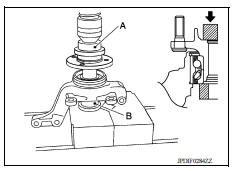
- Install wheel bearing to steering knuckle, using the Tool (A) and a suitable tool (B).
Tool number : ST35271000 ( - )
CAUTION:
- Do not reuse wheel bearing.
- Do not apply a cleaning agent or anticorrosive to the mounting surface of the wheel bearing of steering knuckle.
- Install wheel bearing with the wheel sensor rotor rubber part (C) faced to the steering knuckle inner side.
- The wheel sensor rotor of the wheel bearing must be kept free of foreign matter.
- The press-fit load must be applied to the wheel bearing outer race and the steering knuckle.
- Do not apply press-fit load to the wheel bearing inner race, the seal (C) on the rubber surface side (wheel sensor rotor side), and the seal (D) on the metallic surface side. If a press-fit load is applied, the wheel bearing must be replaced with a new one.
- Wheel bearing press-fit load must be 49 kN (5,000 kg-f, 11,015 lb-f).
2. Install snap ring to steering knuckle.
CAUTION:
- Do not damage the wheel bearing seal.
- The snap ring must be installed evenly into the groove.
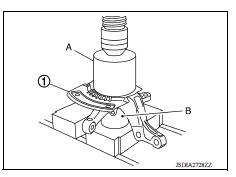
3. Press splash guard (1) into the steering knuckle using suitable tools (A and B).
CAUTION: Do not reuse splash guard.
4. Install wheel hub, using Tools.
Tool number (A) : ST33061000 ( - )
Tool number (B) : ST35321000 ( - )
CAUTION:
- Do not apply lubricating oil to the press-fit surface of the wheel hub bearing.
- Set wheel hub and wheel bearing horizontally and insert them vertically.
- The press-fit load must be applied to the wheel hub and the wheel bearing inner race.
- Do not apply press-fit load to the steering knuckle and the wheel bearing, the seal. If a press-fit load is applied, the wheel bearing must be replaced with a new one.
- Apply a press-fit load of 49 kN (5,000 kg-f, 11,015 lb-f) and maintain the loaded state for 30 seconds.
- If the inserted wheel hub is removed again, the wheel bearing must be replaced with a new one.
Inspection
INSPECTION AFTER REMOVAL
Check the following items, and replace the part if necessary.
- Check components for deformation, cracks, and other damage.
- Check boots of transverse link and steering outer socket ball joint for breakage, axial end play, and swing torque. Refer to FSU "Inspection and Adjustment" and ST "Inspection".
INSPECTION AFTER DISASSEMBLY
Wheel Hub
- Check wheel hub for cracks (with magnetic exploration or dye testing). Replace if necessary.
Steering Knuckle
- Check steering knuckle for deformation, cracks, and other damage. Replace if any non-standard conditions are found.
Snap Rings
- Check snap ring for wear or cracks. Replace if necessary.
INSPECTION AFTER ASSEMBLY
Check wheel bearing rotating torque as per the following instructions.
NOTE: The adequacy of turning torque can be judged from a measurement value by a spring balancer.
- For a proper fit of the bearing, turn the wheel hub both clockwise and counterclockwise, respectively, 10 times or more with a press-fit load of 34,300 - 49,000 N (3,500 - 4,998 kg-f, 7,710 - 11,015 lb-f) applied.
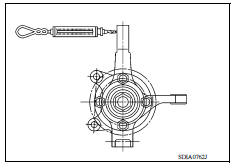
- Set a spring balance on strut mounting hole (upper). Measure rotating torque at an rpm of 8 - 12 rpm.
Rotating torque : Refer to FAX "Wheel Bearing".
Spring balance measurement : Refer to FAX "Wheel Bearing".
- If the turning torque cannot be obtained by the above method, measure the torque, according to the instructions below.
- Install drive shaft and tighten the hub lock nut to the specified torque. Rotate the wheel hub to fit properly.
- Set a spring balancer to the hub bolt and measure turning torque at turning speeds of 8 to 12 rpm.
Rotating torque : 0.16 N*m (0.016 kg-m, 1.4 in-lb) or less
Spring balance measurement : 0.32 N (0.03 kg-f, 0.07 lb-f) or less
INSPECTION BEFORE INSTALLATION
Check wheel sensor rotor for foreign matter. Clean the rotor, if necessary.
INSPECTION AFTER INSTALLATION
- Check wheel sensor harness for proper connection. Refer to BRC "FRONT WHEEL SENSOR : Exploded View".
- Check the wheel alignment. Refer to FSU"Inspection and Adjustment".
 Front wheel hub and knuckle
Inspection Check the axle and suspension parts for excessive play, wear, or damage. Shake each front wheel to check for excessive play as shown. FRONT WHEEL BEARING INSPECTION Move whe ...
Front drive shaft
Exploded View 1. Drive shaft 2. Cotter pin A. Apply Molykote M77 Removal and Installation REMOVAL Remove the wheel and tire assembly using power tool. Refer to WT "Adjustment" ...
Other materials:
Fuel filler cap warning system
FUEL FILLER CAP WARNING SYSTEM : System Diagram
FUEL FILLER CAP WARNING SYSTEM : System Description
INPUT/OUTPUT SIGNAL CHART
Input
Unit/Sensor
Input signal to ECM
ECM function
EVAP control system pressure sensor
Pressure in purge line
Fuel filler cap warning cont ...
Service data and specifications
(SDS)
General Specification
CAUTION:
Use only Genuine NISSAN CVT Fluid NS-3. Do not mix with other
fluid.
Use only Genuine NISSAN CVT Fluid NS-3. Using transmission fluid
other than Genuine NISSAN CVT Fluid NS-3 will damage
the CVT, which is not covered by the (NISSAN new vehicle limi ...
Categories
- Manuals Home
- Nissan Versa Owners Manual
- Nissan Versa Service Manual
- Video Guides
- Questions & Answers
- External Resources
- Latest Updates
- Most Popular
- Sitemap
- Search the site
- Privacy Policy
- Contact Us

0.0078