Nissan Versa (N17): Repairing material
Foam Repair
During factory assembly, foam insulators are installed in certain body panels and locations around the vehicle.
Use the following procedure(s) to replace any factory-installed foam insulators.
URETHANE FOAM APPLICATIONS
Use commercially available Urethane foam for sealant (foam material) repair of material used on vehicle.
<Urethane foam for foaming agent> 3M Automix Flexible Foam 08463 or equivalent
Read instructions on product for fill procedures.
FILL PROCEDURES
Example of foaming agent filling operation procedure:
1. Fill procedures after installation of service part.
a. Eliminate foam material remaining on vehicle side.
b. Clean area after eliminating form insulator and foam material.
c. Install service part.
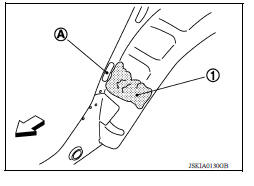
d. Insert nozzle into hole (A) near fill area and fill foam material (1) or fill enough to close gap with the service part.
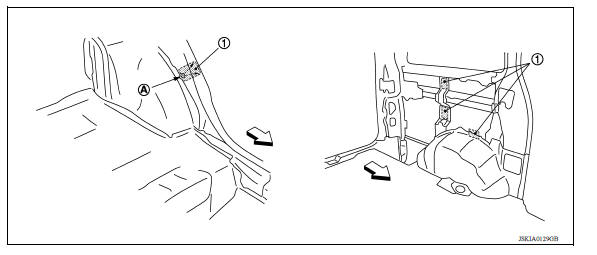
1. Urethane foam A. Nozzle insert hole  Front
Front
2. Fill procedures before installation of service part:
a. Eliminate foam material remaining on vehicle side.
b. Clean area after eliminating foam insulator and foam material.
c. Fill with enough foam material on the wheelhouse outer side to close the gap with the service part while avoiding the flange area.
d. Install service part.
NOTE: Refer to the label on the urethane foam container for information on working times.
1. Urethane foam
A. Fill while avoiding flange area
 : Front
1. Body side outer 2. Body side insulation (foam) front pillar 3. Body side
insulation (foam) roof side rail 4. Roof panel assembly 5. Body side insulation
(foam) rear pillar 6. Body side insulation (foam) rear pillar lower 7. Body side
insulation strip, front pillar lower reinforcement  Front
Front
BODY COMPONENT PARTS
Underbody Component Parts
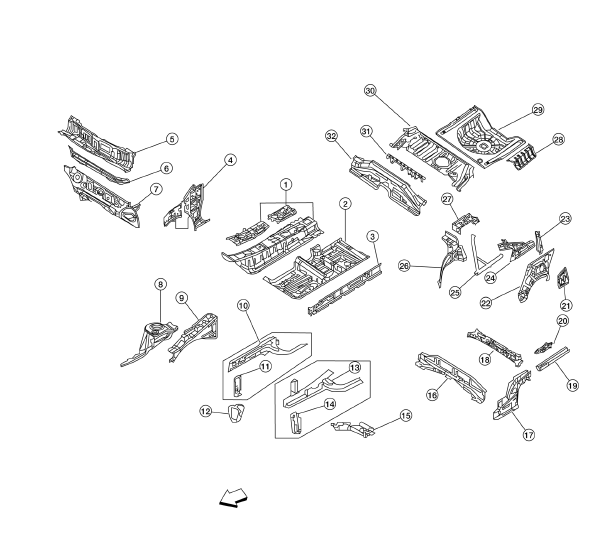
1. Front floor center 2. Front floor assembly (LH/RH) 3. Sill reinforcement (LH/RH)
4. Dash side (LH/RH) 5. Upper dash assembly 6. Member dash lower cross
7. Lower dash assembly 8. Strut housing (LH/RH) 9. Hood ledge (LH/RH) 10.
Closing plate inner assembly (LH/
RH) 11. Radiator core inner side support (LH/RH)
12. Member assembly front side front
(LH/RH)
13. Closing plate front outer assembly
(LH/RH)
14. Radiator core outer side support 15. Front suspension mounting
bracket (LH/RH)
16. Rear center crossmember assembly
17. Hood ledge reinforcement assembly
(LH/RH)
18. Rear seat crossmember assembly
19. Outer sill support bracket (LH/
RH)
20. Towing hook bracket 21. Extension rear wheel house outer
(LH/RH)
22. Rear wheel housing outer (LH/
RH)
23. Rear pillar inner reinforcement
(LH/RH)
24. Rear inner pillar (LH/RH)
25. Rear seatback support brace (LH/
RH)
26. Rear wheel housing inner (LH/
RH)
27. Parcel shelf side (LH/RH)
28. Rear floor rear side (LH/RH) 29. Rear floor rear 30. Rear floor front
31. Rear seat upper crossmember 32. Rear floor front extension  Front
Front
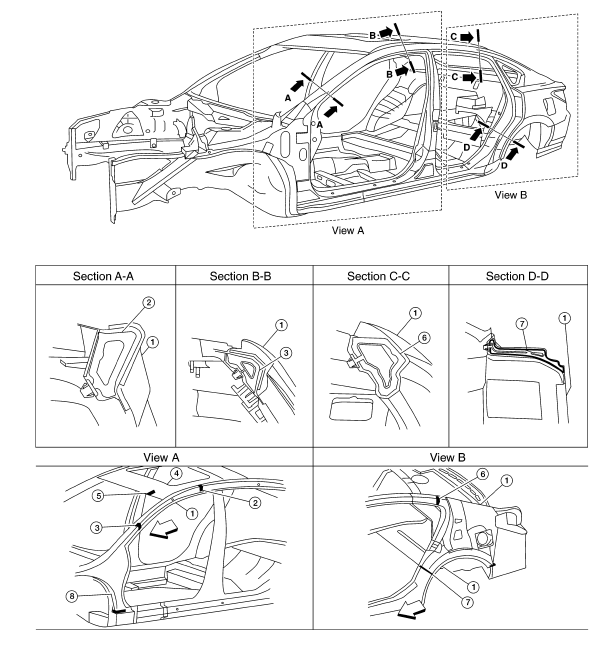
Body Component Parts
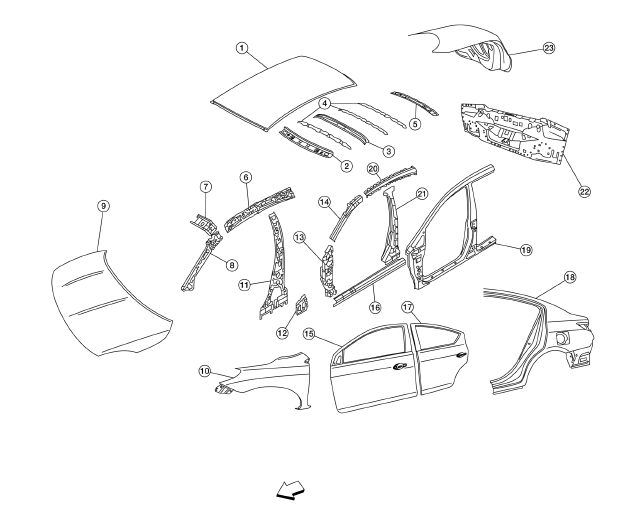
1. Roof panel assembly 2. Front roof rail 3. Roof reinforcement
4. Roof rail 5. Rear roof rail 6. Roof inner side rail (LH/RH)
7. Front roof rail brace (LH/RH) 8. Front pillar inner (LH/RH) 9. Hood assembly
10. Front fender (LH/RH) 11. Center pillar inner (LH/RH) 12. Rear fender corner
(LH/RH) 13. Front pillar lower hinge brace
(LH/RH)
14. Front pillar reinforcement (LH/RH) 15. Front door assembly (LH/RH)
16. Inner sill reinforcement (LH/RH) 17. Rear door assembly (LH/RH) 18. Rear
body side outer (LH/RH)
19. Front body side outer (LH/RH) 20. Roof side rail reinforcement (LH/RH) 21.
Center pillar reinforcement
22. Rear panel assembly 23. Trunk lid assembly  Front
Front
REMOVAL AND INSTALLATION
 Precautions in repairing high
strength steel
Precautions in repairing high
strength steel
High Strength Steel (HSS) High strength steel is used for body panels in order to reduce vehicle weight. Accordingly, precautions in repairing automotive bodies made of high strength steel are ...

Other materials:
Clutch pedal
Exploded View
1. Clutch pedal 2. Pedal stopper rubber 3. Pedal pad
4. Clip 5. Clutch interlock switch
Removal and Installation
REMOVAL
Remove the instrument lower panel LH. Refer to IP, "Removal and
Installation".
Disconnect master cylinder rod end from clutch pedal.
D ...
Compressor
Exploded View
1. Compressor
Removal and Installation
CAUTION:
Perform oil return operation before each refrigeration system disassembly.
However, if a large amount
of refrigerant or oil is detected, do not perform oil return operation. Refer to
HA "Perform Oil
Return Operation&q ...
Categories
- Manuals Home
- Nissan Versa Owners Manual
- Nissan Versa Service Manual
- Video Guides
- Questions & Answers
- External Resources
- Latest Updates
- Most Popular
- Sitemap
- Search the site
- Privacy Policy
- Contact Us

0.006