Nissan Versa (N17): Trunk lid assembly
Trunk lid assembly : Removal and Installation
REMOVAL
- Remove trunk lid finisher (if equipped). Refer to INT "Removal and Installation".
- Disconnect the harness connector from license plate lamp. Refer to EXL "Removal and Installation".
- Remove harness clips from trunk lid assembly, and then pull out harness from trunk lid assembly.
- Remove the trunk lid hinge bolts on trunk lid side and remove the trunk lid assembly.
CAUTION: Use two people when removing or installing trunk lid, due to its heavy weight.
INSTALLATION
Installation is in the reverse order of removal.
CAUTION:
- After installation, perform trunk lid adjustment procedure. Refer to DLK "TRUNK LID ASSEMBLY : Adjustment".
- After installation, check trunk lid open/close, lock/unlock operation.
- Apply touch-up paint (body color) onto the heads of the trunk lid hinge bolts.
Trunk lid assembly : Adjustment
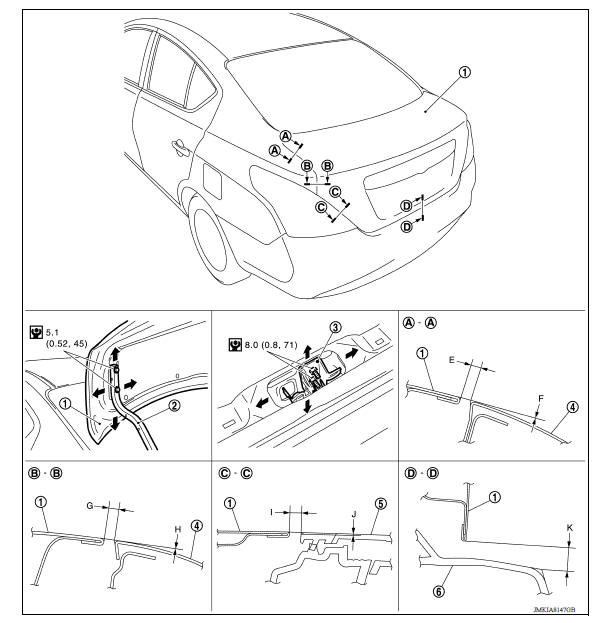
1. Trunk lid assembly 2. Trunk lid hinge 3. Trunk lid striker 4. Body side outer 5. Rear combination lamp 6. Rear bumper fascia
Check the clearance and surface height between trunk lid and each part by visual inspection and tactile feel.
If the clearance and surface height are out of specification, adjust them
according to the adjustment procedure.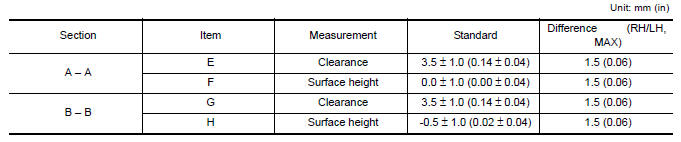

- Loosen trunk lid hinge bolts (trunk lid side).
- Remove trunk rear plate. Refer to INT "TRUNK REAR PLATE : Removal and Installation".
- Loosen trunk lid striker bolts.
- Lift up trunk lid approximately 100 - 150 mm (3.9 - 5.9 in) then close it lightly and check that it is engaged firmly with trunk lid closed.
- Check the clearance and surface height.
- Tighten trunk lid hinge and trunk lid striker.
- Install trunk rear plate. Refer to INT "TRUNK REAR PLATE : Removal and Installation".
TRUNK LID STRIKER ADJUSTMENT
Adjust trunk lid striker so that it becomes parallel with trunk lid lock insertion direction.
 Door check link
DOOR CHECK LINK : Removal and Installation REMOVAL Fully close the rear door window. Remove rear door finisher. Refer to INT "Removal and Installation". Remove rear door speaker b ...
Trunk lid striker
TRUNK LID STRIKER : Removal and Installation REMOVAL 1. Remove trunk rear plate. Refer to INT "TRUNK REAR PLATE : Removal and Installation". 2. Remove trunk lid opener cable bolt (A) an ...
Other materials:
RearView Monitor (if so equipped)
1. CAMERA button (models with navigation)
WARNING
Failure to follow the warnings and instructions
for proper use of the Rear-
View Monitor system could result in serious
injury or death.
RearView Monitor is a convenience feature
and is not a substitute for proper
backing. Always ...
Recommended fluids/lubricants and capacities
The following are approximate capacities. The actual refill capacities may
be a little different. When refilling, follow the procedure
described in the "Do-it-yourself" section to determine the proper refill
capacity.
...
Categories
- Manuals Home
- Nissan Versa Owners Manual
- Nissan Versa Service Manual
- Video Guides
- Questions & Answers
- External Resources
- Latest Updates
- Most Popular
- Sitemap
- Search the site
- Privacy Policy
- Contact Us

0.0065