Nissan Versa (N17): Trunk lid hinge
TRUNK LID HINGE : Removal and Installation
REMOVAL
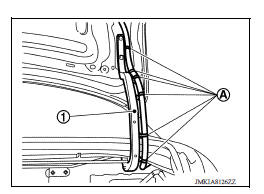
1. Remove harness clips (A) from trunk lid hinge (RH only) (1).
2. Remove trunk lid assembly. Refer to DLK "TRUNK LID ASSEMBLY : Removal and Installation".
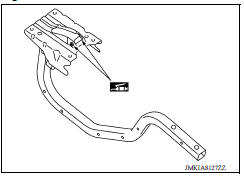
3. Remove torsion bar. Refer to DLK "TORSION BAR : Removal and Installation".
4. Remove rear parcel shelf finisher. Refer to INT "Removal and Installation".
5. Remove trunk lid hinge bolts (body side) and then trunk lid hinge.
INSTALLATION
Installation is in the reverse order of removal.
CAUTION:
- After installation, check trunk lid open/close, lock/unlock operation.
- After installation, perform the trunk lid adjustment procedure. Refer to DLK "TRUNK LID ASSEMBLY : Adjustment".
- Apply touch-up paint (body color) onto the heads of trunk lid hinge bolts.
- Check trunk lid hinge rotating point for poor lubrication. If necessary, apply a suitable multi-purpose grease.
 Trunk lid striker
TRUNK LID STRIKER : Removal and Installation REMOVAL 1. Remove trunk rear plate. Refer to INT "TRUNK REAR PLATE : Removal and Installation". 2. Remove trunk lid opener cable bolt (A) an ...
Torsion bar
TORSION BAR : Removal and Installation REMOVAL Remove torsion bar clamp. Support trunk lid with a suitable tool. WARNING: Bodily injury may occur if trunk lid is not supported properly when ...
Other materials:
Fuel tank
Exploded View
1. Fuel tank 2. Fuel tank mounting band (RH) 3. Fuel tank mounting band (LH)
4. Clamp 5. Fuel filler hose 6. Fuel filler tube
7. Grommet 8. Fuel filler cap 9. Clamp
10. Vent hose
Removal and Installation
WARNING:
Be sure to read "General Precautions" before working on the fu ...
DLC Branch line circuit
Diagnosis Procedure
1.CHECK CONNECTOR
1. Turn the ignition switch OFF.
2. Disconnect the battery cable from the negative terminal.
3. Check the terminals and connectors of the data link connector for damage,
bend and loose connection
(connector side and harness side).
Is the inspection resul ...
Categories
- Manuals Home
- Nissan Versa Owners Manual
- Nissan Versa Service Manual
- Video Guides
- Questions & Answers
- External Resources
- Latest Updates
- Most Popular
- Sitemap
- Search the site
- Privacy Policy
- Contact Us

0.006