Nissan Versa (N17): Door parting seal
Exploded View
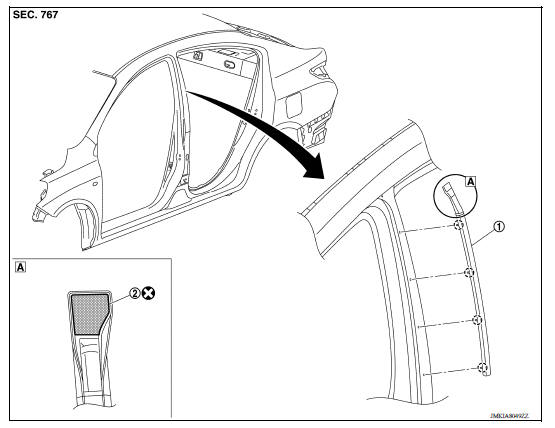
1. Door parting seal 2. Double-sided tape [t: 1.6 mm (0.065 in)]  Clip
Clip
Removal and Installation
REMOVAL
1. Open front door and rear door.
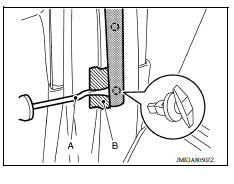
2. Release door parting seal clips using a suitable tool (A).
 : Clip
CAUTION: Apply protective tape (B) on body to protect the painted surface from damage.
3. Remove door parting seal.
INSTALLATION
Installation is in the reverse order of removal.
CAUTION:
- Always replace double-sided tape with a new tape if door parting seal is reused.
- Do not wash the vehicle within 24 hours after installing so as to keep adhesive dry.
 Trunk lid finisher
Exploded View 1. Trunk lid finisher 2. Emblem 3. Rear view camera (if equipped) Pawl Clip Removal and Installation REMOVAL 1. Remove trunk lid finisher inner. Refer to INT "Removal and ...
Rear spoiler
Exploded View 1. Rear spoiler 2. High-mounted stop lamp harness connector 3. Harness grommet Removal and Installation Removal 1. Remove trunk lid finisher (if equipped). Refer to EXT &qu ...
Other materials:
Air cleaner filter
Exploded View
1. Clamp 2. PCV hose 3. Clamp
4. Mount rubber 5. Air duct (inlet) 6. Air cleaner body
7. Grommet 8. Air cleaner filter 9. Air cleaner cover
10. Mass air flow sensor 11. Air duct 12. Clamp
Removal and Installation
REMOVAL
1. Unhook clips (A) and pull the air cleaner cover u ...
Diagnosis and repair work flow
Work Flow
NOTE:
The Signal Tech II Tool (J-50190) can be used to perform the following
functions. Refer to the Signal Tech II User Guide for additional information.
Activate and display TPMS transmitter IDs
Display tire pressure reported by the TPMS transmitter
Read TPMS DTCs
Register ...
Categories
- Manuals Home
- Nissan Versa Owners Manual
- Nissan Versa Service Manual
- Video Guides
- Questions & Answers
- External Resources
- Latest Updates
- Most Popular
- Sitemap
- Search the site
- Privacy Policy
- Contact Us

0.0057