Nissan Versa (N17): Trunk lid lock
TRUNK LID LOCK : Removal and Installation
REMOVAL
1. Remove trunk lid finisher (If equipped). Refer to INT "Removal and Installation".
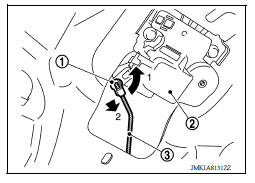
2. Disengage rod holder (1) by lifting upward, and then separate trunk lid lock rod (3) from trunk lid lock assembly (2).
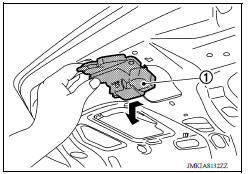
3. Remove trunk lid lock assembly bolts.
4. Disconnect the harness connector and then remove trunk lid lock assembly (1).
INSTALLATION
Installation is in the reverse order of removal.
CAUTION:
-
After installation, check trunk lid open/close, lock/unlock operation.
-
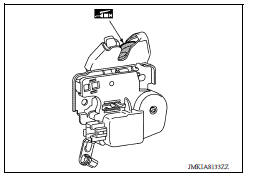
Check trunk lid lock assembly for poor lubrication. Apply a suitable multi-purpose grease to trunk lid lock if necessary.
 Outside handle
OUTSIDE HANDLE : Removal and Installation REMOVAL 1. Fully close rear door glass. 2. Remove rear door finisher. Refer to INT "Removal and Installation". 3. Remove sealing screen. NOTE ...
Trunk lid opener handle
TRUNK LID OPENER HANDLE : Removal and Installation REMOVAL 1. Remove front kicking plate (LH). Refer to INT "KICKING PLATE INNER : Removal and Installation". 2. Release pawl using a sui ...
Other materials:
Output speed sensor
Exploded View
1. Output speed sensor 2. O-ring 3. Transaxle assembly
Front
Removal and Installation
REMOVAL
Remove the front LH wheel and tire.
Disconnect the harness connector from output speed sensor.
Remove the output speed sensor.
Remove the O-ring from the output speed sens ...
Rear drum brake
Exploded View
1. Shoe hold pin 2. Back plate 3. Plug
4. Brake shoe 5. Spring 6. Upper spring
7. Adjuster 8. Return spring 9. Brake drum
10. Boot 11. Piston 12. Piston cup
13. Spring 14. Wheel cylinder 15. Bleeder valve
16. Cap
1: Apply rubber grease.
2: Apply PBC (Poly Butyl Cuprysil) ...
Categories
- Manuals Home
- Nissan Versa Owners Manual
- Nissan Versa Service Manual
- Video Guides
- Questions & Answers
- External Resources
- Latest Updates
- Most Popular
- Sitemap
- Search the site
- Privacy Policy
- Contact Us

0.0048